
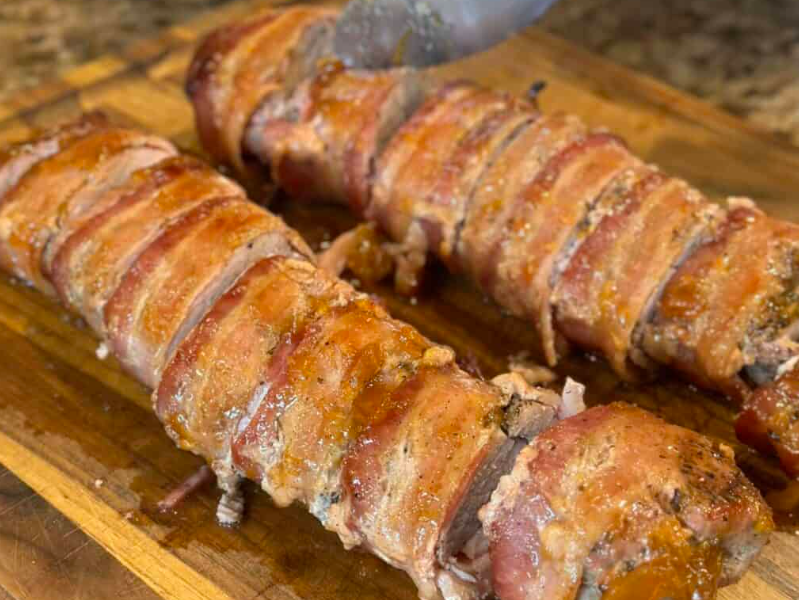
The Ultimate Guide to the Most Juicy, Flavor-Packed Glazed Pork Tenderloin You’ll Ever Taste
Let’s be completely honest for a moment: pork tenderloin gets a pretty bad reputation in the culinary world. We have all been victims of it at some point in our lives. You sit down for dinner, excited for a hearty meal, only to be served a slice of pork that has the texture, moisture level, and overall flavor profile of an old leather boot. It’s dry, it’s chewy, it requires a gallon of water just to swallow, and it completely ruins the evening.
Because pork tenderloin is such a lean cut of meat, people are absolutely terrified of undercooking it. And what happens when people are scared of undercooking meat? They overcook it into oblivion.
But today, we are putting an end to dry pork. Forever.
Welcome to your masterclass on how to create a restaurant-quality Glazed Pork Tenderloin right in the comfort of your own kitchen. This isn’t just another boring weeknight recipe; this is a game-changing, flavor-packed, sweet-and-savory masterpiece that will make you look like an absolute culinary genius to your family and friends. We are talking about a beautiful crust on the outside, a deeply caramelized best brown sugar pork glaze, and an interior that is so incredibly juicy it practically melts in your mouth.
Best of all? This is an easy pork tenderloin recipe that transitions flawlessly from a chaotic Tuesday night dinner to an elegant weekend dinner party centerpiece. Grab your apron, preheat your oven, and let’s dive deep into the secrets of perfect pork.
The Anatomy of the Perfect Cut: Tenderloin vs. Loin
Before we even walk into the kitchen or turn on the stove, we need to address the single biggest mistake people make at the grocery store. You walk down the meat aisle, you see a label that says “Pork Loin,” and right next to it, you see a label that says “Pork Tenderloin.” They sound exactly the same, right? They’re both pork, they both have the word “loin” in them, and they’re sitting right next to each other.
Do not be fooled. Buying the wrong cut will completely ruin this recipe.
Pork Loin
This is a massive, wide, thick cut of meat. It’s often sold as a large roast or cut down into pork chops. It has a distinct fat cap on the top and takes a significant amount of time to roast. If you try to use a pork loin for this fast-cooking recipe, you will end up with raw meat in the middle and burnt glaze on the outside.
Pork Tenderloin
This is what we want. It is a long, narrow, cylindrical muscle that runs along the spine of the pig. Because this muscle doesn’t do a lot of heavy lifting, it is incredibly lean and naturally tender—hence the name tenderloin. It cooks very quickly, making it the king of 30-minute weeknight dinners.
Natasya’s Golden Rule: Always double-check the packaging. Look for a cut that weighs roughly 1 to 1.5 pounds, looks like a long log, and is clearly labeled as a tenderloin.
The Secret Chemistry: How to Cook Pork Tenderloin Without Drying It Out
Now that you have the correct cut of meat, let’s talk about the science of keeping it juicy. Because pork tenderloin has almost zero internal fat marbling, it has no safety net. If you overcook a fatty piece of meat like a ribeye steak or a pork shoulder, the melting fat keeps things tasting juicy. If you overcook a pork tenderloin by even five minutes, it turns into sawdust.
So, how do we fix this? We use a three-pronged approach: trimming, searing, and checking the temperature.
1. Prepping and Removing the “Silver Skin”
When you slide your pork tenderloin out of its packaging, you will notice a shiny, whitish-blue membrane running along the surface of the meat. This is called the silver skin. Unlike regular fat, silver skin does not melt away or tenderize when it cooks. Instead, it shrinks up, becomes incredibly tough, and makes your meat chew like rubber.
To remove it, slip a sharp knife just under the membrane at one end, tilt the blade slightly upward toward the silver skin (away from the meat), and slide the knife along the length of the log. It takes about thirty seconds, but it makes a world of difference in the final texture of your roasted pork tenderloin.
2. The Power of the Sear
We are not just throwing raw meat into the oven. To get that iconic restaurant look and lock in the surface juices, we need to sear the pork in a hot skillet before it finishes baking. This triggers the Maillard reaction—a fancy scientific term for the chemical reaction between amino acids and reducing sugars that gives browned food its deeply savory flavor. A good sear creates a flavor foundation that pairs beautifully with our sweet glaze.
3. Trust the Meat Thermometer
If you take away only one piece of advice from this entire guide, let it be this: Buy a digital instant-read meat thermometer.
For decades, old-school cookbooks taught people that pork had to be cooked until it was completely white and chalky in the middle. This was due to historical health fears that simply do not apply to modern, safely regulated agriculture. Today, health organizations confirm that pork is perfectly safe and incredibly delicious when cooked to an internal temperature of 145°F (63°C), followed by a brief rest. At 145°F, the pork will still have a very slight, beautiful blush of pink in the center, and it will be spectacularly juicy.
Gathering Your Ingredients
The beauty of this easy pork tenderloin recipe is that it relies heavily on everyday pantry staples. You don’t need to run to a specialty market or track down exotic spices. The magic lies in how these simple ingredients interact to create a complex balance of sweet, savory, tangy, and rich tones.
For the Pork:
- Pork Tenderloin: 1 to 1.5 pounds, silver skin removed.
- Olive Oil: Just a tablespoon to coat the pan for that perfect sear.
- Garlic Powder & Onion Powder: Our flavor anchors that ensure the meat tastes incredible even beneath the glaze.
- Smoked Paprika: Adds a subtle, earthy wood-smoke undertone that cuts through the sweetness of the sugar.
- Salt and Freshly Cracked Black Pepper: Generous amounts to season the meat thoroughly.
For the Best Brown Sugar Pork Glaze:
- Light or Dark Brown Sugar: The absolute core of our glaze. Brown sugar contains molasses, which gives it a rich, caramel-like depth and helps it stick to the meat like a dream.
- Soy Sauce: Provides the essential salty, umami contrast to balance out the intense sweetness of the sugar.
- Apple Cider Vinegar: Don’t skip this! The acidity cuts through the sweetness, brightens up the entire dish, and helps tenderize the exterior of the meat.
- Fresh Garlic: Minced fine. Fresh garlic hits completely differently than garlic powder, releasing aromatic oils into the glaze as it bubbles in the oven.
- Dijon Mustard: Act as an emulsifier. It binds the oil, sugar, and liquids together so the glaze doesn’t separate, while adding a very subtle, sophisticated tang.
Step-by-Step Instructions: The Playbook for Perfection
Now that your ingredients are lined up and your silver skin is gone, it is time to bring this dish to life. Follow these steps precisely, and you will guarantee a flawless result.
Step 1: Seasoning with Intention
Pat your pork tenderloin completely dry with paper towels. Just like when we make wings, moisture is the absolute enemy of a good sear. If the surface is wet, the meat will steam in the pan instead of forming a crust.
In a small bowl, mix together your salt, black pepper, garlic powder, onion powder, and smoked paprika. Rub this dry mixture generously over every square inch of the pork. Don’t be shy—press the spices into the meat so they stick during the searing process.
Step 2: The Perfect Pan Sear
Place a large, oven-safe skillet (cast iron is the gold standard here, but any heavy-bottomed skillet works) over medium-high heat. Add your olive oil and let it heat up until it is shimmering and just starting to show a faint wisp of smoke.
Carefully lay the seasoned pork tenderloin into the hot pan. You should hear a loud, satisfying sizzle immediately. Let it cook undisturbed for about 2 to 3 minutes until a gorgeous brown crust forms. Roll the pork a quarter turn and repeat. Continue this process until the pork is beautifully seared on all sides. This should take about 6 to 8 minutes in total.
Step 3: Whisking the Glaze
While your pork is searing, quickly whisk together your brown sugar, soy sauce, apple cider vinegar, minced fresh garlic, and Dijon mustard in a small bowl. It will look like a thick, dark syrup. Taste it—it should hit you with a wave of sweetness, followed immediately by a savory punch and a tangy zip from the vinegar.
Step 4: Coating and Roasting
Once the pork is seared, turn off the stovetop heat. If you are using an oven-safe skillet, you can leave the meat right in the pan. If your skillet isn’t oven-safe, transfer the pork to a greased baking dish.
Pour about two-thirds of your glaze directly over the top of the pork tenderloin. Use a pastry brush to spread it evenly so the entire log is coated in that glossy, sweet mixture.
Pop the skillet or baking dish into an oven preheated to 400°F (200°C).
Step 5: The Basting Ritual
Set a timer for 10 minutes. When the timer goes off, open the oven, pull the pan out slightly, and use a spoon to scoop up the hot glaze that has pooled at the bottom of the pan. Drizzle it right back over the top of the meat. This process is called basting, and it is how we build up that thick, sticky, professional-looking lacquer on our Glazed Pork Tenderloin. Pour the remaining fresh glaze from your bowl over the top as well.
Return it to the oven and let it cook for another 5 to 10 minutes, keeping a very close eye on the internal temperature.
Step 6: The Final Temp Check and Crucial Rest
Insert your digital meat thermometer into the thickest part of the tenderloin. As soon as it registers 140°F to 143°F, pull it out of the oven!
Wait, didn’t you say 145°F earlier? Yes! This is a concept called carryover cooking. When meat comes out of a hot oven, the residual heat on the outside of the log continues to travel inward, raising the core temperature by another 3 to 5 degrees while it sits on the counter. If you wait until it hits 145°F inside the oven, it will climb to 150°F+ on the counter, and you’ll lose that precious juiciness.
Transfer the pork to a clean cutting board and tent it loosely with aluminum foil. Let it rest for 10 minutes. Do not skip this! If you cut into the meat immediately, all the pressurized juices will instantly run out onto your board, leaving the pork dry. Resting allows the muscle fibers to relax and reabsorb those delicious juices.
Customizing Your Flavor: Sweet and Savory Pork Marinades
Once you master this base recipe, you can start experimenting with your own flavor profiles. The template for sweet and savory pork marinades and glazes always follows a simple rule: Base Sweetness + Umami/Salt + Acid + Aromatics.
Here are a few awesome variations you can try next time:
| Style | Sweet Element | Salty/Umami Element | Acid Element | Aromatics / Extras |
| The Classic | Brown Sugar | Soy Sauce | Apple Cider Vinegar | Fresh Garlic, Dijon |
| Hot Honey | Raw Honey | Tamari or Soy Sauce | Fresh Lime Juice | Red Pepper Flakes, Sriracha |
| The Orchard | Maple Syrup | Worcestershire Sauce | Apple Juice | Fresh Thyme, Rosemary |
| Asian-Inspired | Hoisin Sauce | Soy Sauce | Rice Vinegar | Fresh Ginger, Sesame Oil |
What to Serve Alongside Your Masterpiece
A star entree deserves some fantastic backup singers. Because this roasted pork tenderloin features a rich, sweet, and tangy glaze, you want side dishes that can either soak up that extra sauce or cut through the richness with fresh, vibrant flavors.
The Carbs (The Sauce Soakers)
- Garlic Mashed Potatoes: There is nothing better than slicing your pork and letting that sticky brown sugar glaze run into a cloud of creamy, buttery mashed potatoes.
- Fluffy White Rice or Quinoa: A simpler option that lets the flavors of the glaze shine completely on their own.
- Roasted Sweet Potatoes: If you want to double down on the cozy, autumn-style sweet vibes, toss some cubed sweet potatoes with olive oil, salt, and rosemary, and roast them on a separate pan right alongside the pork.
The Greens (The Refreshers)
- Roasted Asparagus: Snap off the woody ends, toss the spears with olive oil, sea salt, and a squeeze of fresh lemon juice, and roast them at 400°F during the last 10 minutes of your pork’s cooking time. The bright acidity of the lemon balances the glaze beautifully.
- A Crisp Green Salad: A simple mix of arugula, spinach, shaved parmesan, and a sharp vinaigrette helps cleanse the palate between bites of rich pork.
- Sauteed Green Beans: Flash-fry some green beans in a pan with a little bit of butter and minced garlic for a classic, family-friendly crunch.
Frequently Asked Questions (FAQ)
Can I make this ahead of time for meal prep?
Absolutely! This pork holds up beautifully. You can slice it, store it in an airtight container with the leftover pan juices, and keep it in the fridge for up to 4 days. When reheating, do it gently in the microwave at 70% power or in a warm skillet with a splash of water so you don’t dry it out.
Why did my glaze burn at the bottom of the pan?
Because our glaze contains a high amount of sugar, it can burn if the pan gets too hot or if the pork cooks too long. If you notice the glaze turning black or smelling burnt during the roasting process, add two or three tablespoons of water or chicken broth to the bottom of the pan to loosen it up and lower the temperature of the sugars.
Can I make this in an Air Fryer?
Yes! The air fryer is awesome for creating 30-minute weeknight dinners. Set your air fryer to 375°F (190°C). Season and glaze the pork, then place it in the air fryer basket. Cook for about 18 to 22 minutes, flipping and basting with extra glaze halfway through, until the internal temperature reaches 142°F.
Final Thoughts: Go Forth and Conquer Dinner Time!
Cooking a spectacular meal doesn’t require complex techniques, hours of tedious prep work, or a massive grocery bill. It just requires understanding your ingredients, respecting the cooking temperatures, and having a killer sauce recipe in your back pocket.
This Glazed Pork Tenderloin checked every single box. It’s fast, it’s affordable, it uses pantry staples, and it delivers a flavor punch that will have everyone reaching for seconds. No more dry pork, no more boring dinners.
Give this recipe a shot tonight, trust your meat thermometer, and watch it instantly join your permanent rotation of favorite meals.
Happy cooking, everyone! 👩🍳✨