
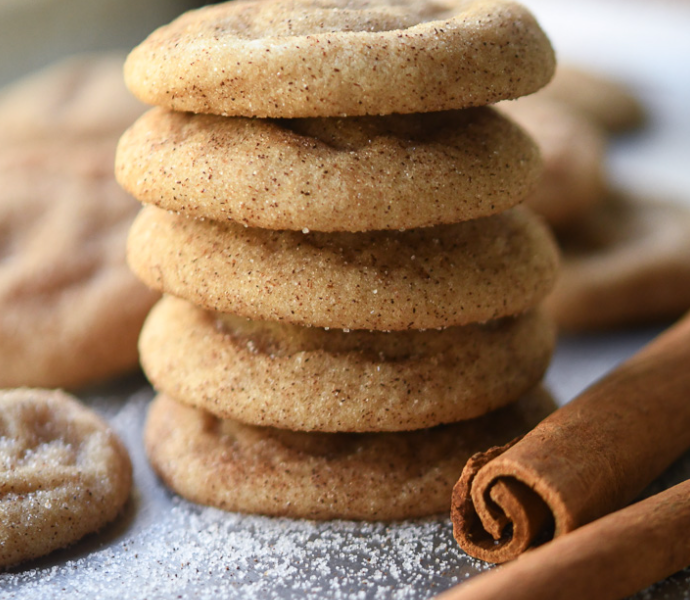
The Absolute Best Brown Butter Snickerdoodles You’ll Ever Bake
Let’s have a serious, unfiltered chat about cookies. We all know the classic chocolate chip cookie usually steals the spotlight. It’s the safe bet, the crowd-pleaser, the one that everyone reaches for at a party. But today, we are throwing the spotlight onto a vintage classic that deserves a massive upgrade: the snickerdoodle.
Now, a standard snickerdoodle is great. It’s sweet, it’s tangy, and it’s rolled in that lovely cinnamon sugar crust. But what if we took that nostalgic favorite and turned the flavor dial all the way up to eleven? What if we introduced a single gourmet baking technique that transforms a simple cookie into a rich, complex, melt-in-your-mouth masterpiece?
Enter the Brown Butter Snickerdoodles.
By taking five extra minutes to brown our butter before mixing it into the dough, we create a cookie with a deeply nutty, caramel-like undertone that pairs flawlessly with warm cinnamon. It completely changes the game. If you are ready to bake the most addictive, chewy brown butter cookies of your entire life, you are in exactly the right place. Grab a saucepan, preheat your oven, and let’s dive into the ultimate guide to cookie perfection!
The Magic of Brown Butter: What Is It and Why Does It Matter?
If you’ve never experimented with browned butter in your baking before, prepare to have your mind blown. In French pastry cooking, this is known as beurre noisette (literally “hazelnut butter”), and it is the ultimate secret weapon for home bakers.
Regular butter is made up of three things: milk fat, water, and milk solids (proteins). When you melt butter in a pan and keep heating it, the water begins to evaporate and boil away. Once the water is gone, the milk solids drop to the bottom of the pan and begin to toast in the hot fat.
This toasting process triggers the Maillard reaction—the exact same chemical reaction that makes a seared steak or toasted bread taste so incredible. The milk solids turn a gorgeous golden-brown color and release an aroma that smells like toasted hazelnuts, rich toffee, and pure happiness.
When you use regular softened butter in a cookie, it provides moisture and structure. But when you use browned butter, it provides a massive, complex punch of flavor that cuts through the sweetness of the sugar and elevates the entire cookie profile. It turns a simple cinnamon sugar cookie into something that tastes like it came out of an artisanal, high-end bakery.
The Essential Ingredient: Do We Really Need Cream of Tartar?
Before we look at the full ingredient lineup, we have to address the elephant in the baking aisle: cream of tartar.
Every true best snickerdoodle recipe absolutely requires cream of tartar. If you omit it, you aren’t actually making a snickerdoodle—you’re just making a sugar cookie rolled in cinnamon. But what exactly does this mysterious white powder do?
Cream of tartar is a dry, acidic byproduct of the winemaking process (specifically, tartaric acid). It serves two crucial purposes in our brown butter snickerdoodles:
- The Signature Tang: That subtle, refreshing, slightly tart flavor that balances out the sweet sugar coating? That is entirely thanks to the cream of tartar.
- The Perfect Chewiness: When the acidic cream of tartar mixes with the alkaline baking soda, it creates a powerful leavening reaction that makes the cookies puff up beautifully in the oven. More importantly, the acid breaks down sucrose into glucose and fructose, which prevents sugar crystals from binding together tightly. This lack of crystallization is the scientific secret behind getting an ultra-soft, pillowy, and chewy brown butter cookie texture rather than a crunchy one.
Ingredients Checklist: Gather Your Supplies
The beauty of this easy homemade snickerdoodles recipe is that it relies on simple, everyday pantry staples. You don’t need anything fancy—just high-quality basics.
For the Cookie Dough:
- 1 cup (2 sticks) Unsalted Butter: We use unsalted so we can fully control the salt level in our dough.
- 2 cups All-Purpose Flour: Properly measured (we’ll talk about the spoon-and-level method below!).
- 1.5 tsp Cream of Tartar: For that essential chew and signature tang.
- 1/2 tsp Baking Soda: Our leavening partner.
- 1/2 tsp Fine Sea Salt: To balance out the rich sugars.
- 3/4 cup Granulated Sugar: Provides structure and crisp edges.
- 1/2 cup Packed Light Brown Sugar: The molasses in brown sugar keeps the centers incredibly soft.
- 1 Large Egg + 1 Egg Yolk: The extra yolk adds richness and extra moisture to ensure maximum chewiness.
- 2 tsp Pure Vanilla Extract: Don’t skimp on the vanilla—it blooms beautifully alongside the brown butter.
For the Sparkling Cinnamon Sugar Coating:
- 1/4 cup Granulated Sugar: Fine white sugar works best for getting an even coat.
- 2 tbsp Ground Cinnamon: Use a high-quality, fragrant cinnamon for the ultimate aromatic experience.
Step-by-Step Kitchen Walkthrough
Let’s get our hands dirty and break down exactly how to assemble these glorious brown butter snickerdoodles.
Step 1: Mastering the Browned Butter Baking Tips
First, let’s make our liquid gold.
- Place your two sticks of unsalted butter into a medium saucepan (ideally a light-colored pan so you can see the color changes easily). Turn the heat to medium.
- The butter will melt, then it will begin to foam and crackle aggressively. This is just the water escaping. Stir or swirl the pan frequently to keep things moving.
- After a few minutes, the crackling will suddenly quiet down, and a dense, fine foam will form on top of the liquid. Look closely beneath the foam—you will see tiny specks turning a rich amber-brown at the bottom of the pan.
- The second you smell a deep, nutty, toffee aroma and see those brown flecks, remove the pan from the heat immediately. Pour the browned butter (and every single one of those delicious dark specks from the bottom!) into a heat-safe bowl.
- Crucial Step: Let the brown butter cool down until it is room temperature or just slightly warm to the touch (about 20-30 minutes). If you mix hot butter directly into your sugar and eggs, it will melt the sugar and cook the eggs, leaving you with greasy, flat cookies.
Step 2: Whisk the Dry Ingredients
While your butter cools, grab a medium bowl and whisk together your all-purpose flour, cream of tartar, baking soda, and sea salt. Make sure there are no clumps of cream of tartar left behind.
Step 3: Mix the Wet Ingredients
Once the brown butter has cooled down but is still liquid, add both the granulated sugar and light brown sugar to the bowl. Whisk vigorously for about a minute until the mixture looks like wet sand.
Add the whole egg, the extra egg yolk, and the vanilla extract. Whisk intensely until the mixture becomes pale, slightly thickened, and smooth.
Step 4: Combine to Form the Dough
Pour your dry flour mixture into the wet ingredients. Switch to a sturdy wooden spoon or rubber spatula and gently fold everything together. Stir just until the white streaks of flour disappear. Over-mixing at this stage activates the gluten in the flour, which will make your cookies tough and bread-like instead of tender and chewy.
Step 5: The Mandatory Chill Time
I know, I know—waiting for dough to chill is the absolute worst part of baking. But for this brown butter snickerdoodles recipe, it is completely non-negotiable.
Cover your bowl tightly with plastic wrap and pop it into the refrigerator for at least 1 to 2 hours. Because we completely melted the butter to brown it, the fat needs time to solidify again. If you bake the dough while it’s warm, the cookies will spread out into flat, greasy puddles on your baking sheet. Chilling also gives the flour time to fully hydrate, resulting in a much deeper, more concentrated flavor.
Step 6: Roll and Coat
Preheat your oven to 350°F (175°C) and line two large baking sheets with parchment paper or silicone baking mats.
In a small, shallow bowl, stir together your 1/4 cup of granulated sugar and 2 tablespoons of ground cinnamon.
Scoop out about 2 tablespoons of chilled dough and roll it between your palms to form a smooth, round ball. Drop the dough ball directly into the cinnamon-sugar mixture, rolling it around until it is completely and heavily coated in sparkling spice. Place the dough balls onto your prepared baking sheets, leaving about 2 inches of space between them so they have room to expand.
Step 7: Bake to Perfection
Pop the sheets into the oven and bake for 9 to 11 minutes.
You want to look for edges that are just set and slightly golden, while the centers still look soft, puffy, and a tiny bit underdone. They will look like they aren’t fully cooked in the middle, but that is exactly what you want! The cookies will continue to cook on the hot baking sheet even after they leave the oven.
Remove from the oven and let them rest on the warm baking sheet for 5 minutes before carefully transferring them to a wire cooling rack to cool completely.
Pro Tips for Cookie Success: The Baker’s Secret Handbook
To make sure your easy homemade snickerdoodles turn out completely flawless on the very first try, keep these pro baking tips in mind:
1. The “Spoon and Level” Method
The number one reason home bakers end up with dry, cakey cookies is that they measure their flour incorrectly. If you scoop your measuring cup directly into a bag of packed flour, you can easily end up adding up to 25% more flour than the recipe actually calls for! Instead, use a spoon to gently fluff up your flour, fluff it into the measuring cup until it overflows, and use the back of a knife to scrape off the excess.
2. The “Cookie Scoot” Hack
Want those perfectly round, gorgeous cookies that look like they belong on an Instagram feed? Try the cookie scoot! The second your cookies come out of the oven while they are still piping hot and soft, place a large round cookie cutter or a large glass upside down over a cookie. Gently move the glass in a circular motion, swirling the cookie inside it. This gently coaxes any uneven edges back into a flawless, uniform circle.
3. Check Your Oven Temperature
Every oven runs a little bit different. If your oven is too hot, your cookies will bake too quickly on the outside while remaining raw in the center. Investing in a cheap, simple oven thermometer that hangs on your center rack is a complete game-changer for getting consistent baking results.
Storage and Freezing: Keep the Softness Alive
If you manage to not eat this entire batch of cinnamon sugar cookies within the first twenty minutes of baking, they store incredibly well!
Storing Baked Cookies
Keep your cooled cookies in a tightly sealed airtight container at room temperature. They will stay incredibly soft and chewy for up to 4 to 5 days.
- Natasya’s Pro Tip: Toss a single slice of plain white bread into the container with your cookies! The cookies will absorb the moisture from the bread, keeping them pillowy-soft for days on end while the bread turns completely stale.
Freezing the Dough for Instant Cravings
This recipe is absolutely perfect for freezing ahead of time so you can have fresh, warm cookies whenever a craving strikes.
- Follow the recipe all the way through rolling the dough balls in the cinnamon sugar mixture.
- Place the coated dough balls onto a baking sheet close together (but not touching) and pop the entire sheet into the freezer for 1 hour until the balls are frozen solid.
- Transfer the frozen dough balls into a heavy-duty freezer zip-top bag. They will keep perfectly for up to 3 months!
- When you are ready to bake, simply place the frozen dough balls onto a parchment-lined sheet and bake them straight from the freezer at 350°F (175°C). Just add an extra 1 to 2 minutes to the total baking time!
Frequently Asked Questions (FAQ)
Can I use salted butter instead of unsalted?
Yes, you can use salted butter if that’s all you have in your fridge! Just make sure to cut your added sea salt down to a tiny, gentle pinch so your cookies don’t end up tasting overly salty.
Why did my cookies turn out flat and thin?
Flat cookies are almost always caused by one of two things: either your browned butter was still too hot when you mixed it with the sugars, or you didn’t chill the dough long enough in the refrigerator. Make sure the dough feels completely firm and cold before it goes into the oven!
Can I skip the cream of tartar and use baking powder instead?
While you can technically substitute 1 teaspoon of baking powder for both the cream of tartar and baking soda combined, I highly discourage it. Baking powder will change the texture, making the cookies more puffy and cake-like, and you will completely lose that iconic snickerdoodle tang.
Why do we add an extra egg yolk?
Egg whites contain a lot of water and can dry out a cookie dough as it bakes. Egg yolks, on the other hand, are packed with natural fats and lecithin. Adding that extra yolk brings incredible richness, binds the fats from our brown butter beautifully, and guarantees that rich, melt-in-your-mouth chewiness.
Final Thoughts: The Cookie That Steals the Show
Baking is all about taking simple, humble ingredients—flour, sugar, butter, and spices—and turning them into something magical. These Brown Butter Snickerdoodles do exactly that. They take a beloved childhood classic and dress it up with a sophisticated flavor profile that appeals to kids and gourmet foodies alike.
The warm aroma of cinnamon sugar blending with the deep, toffee notes of browned butter as these bake in your oven is honestly a religious experience. It’s the ultimate comfort food, best enjoyed with a tall glass of cold milk, a hot cup of coffee, or shared with the people you love most.
So, step away from the basic sugar cookies this weekend. Turn on your stove, brown that butter, and get ready to experience the absolute best cookie of your life.
Happy baking, everyone! 🍪✨