
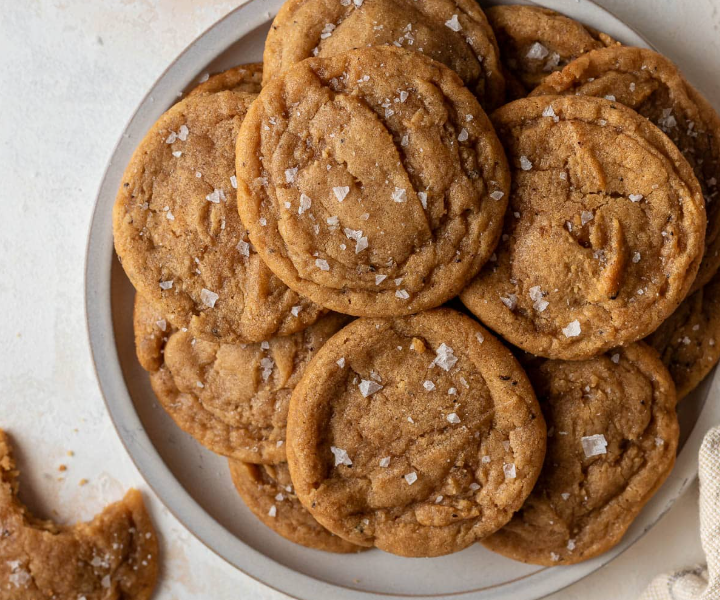
The Ultimate Guide to Chocolate Chipless Cookies: All the Dough, None of the Chunks
Let’s be completely honest for a moment: we need to talk about the controversial elephant in the bakery case. We’ve all been there—you’re baking a fresh batch of classic chocolate chip cookies, your kitchen smells like absolute heaven, and you pull those golden-brown beauties out of the oven. But as you take a bite, you realize something. Your favorite part isn’t actually the hard, melted chocolate chunks. Your absolute favorite part is that rich, buttery, brown-sugar-laden, vanilla-infused cookie dough surrounding them.
In fact, there is a massive, silent community of cookie lovers who actively pick the chocolate chips out of their cookies, or who dig through a tub of raw cookie dough ice cream just to find the dough pieces while leaving the chocolate flakes behind. If that sounds like you, welcome home. You are officially among friends.
Today, we are tossing the chocolate chips completely out the window and making Chocolate Chipless Cookies.
This isn’t just a regular cookie recipe with the chocolate left out. If you simply subtract the chips from a standard recipe, you end up with a flat, overly greasy, sad little sugar cookie because the chocolate chunks actually provide structural support while baking. No, this is a masterfully engineered, standalone recipe designed specifically to highlight the glorious caramelized flavors of premium cookie dough. They are thick, ultra-chewy, rich with browned butter, and feature a melt-in-your-mouth texture that will make you forget chocolate chips ever existed. Let’s dive deep into how to make the best brown sugar cookies on planet Earth!
The Science of the “Chipless” Cookie: Why It’s Not Just a Plain Sugar Cookie
A lot of people hear the phrase “chocolate chip cookies without chips” and immediately assume, “Oh, so you’re just making a standard sugar cookie?”
The answer is a resounding no. Traditional sugar cookies and chocolate chipless cookies are entirely different animals, both in terms of chemical composition and flavor profile. Let’s break down the kitchen science so you can see exactly why this chipless wonder is in a league of its own.
1. The Sugar Ratio (White vs. Brown)
Traditional sugar cookies rely almost entirely on granulated white sugar. This creates a sweet, crisp, and clean flavor with a lighter, fluffier texture. Chocolate chipless cookies, however, are dominated by brown sugar. Brown sugar contains molasses, which is naturally acidic and moisture-retentive. The molasses reacts with baking soda to create a deeper rise, a beautiful dark amber color, and that iconic, dense, fudgy, and soft and chewy chipless cookies texture.
2. The Fat State (Creamed vs. Melted)
When making a standard sugar cookie, you usually cream softened, room-temperature butter with sugar to trap air bubbles, leading to a cake-like, delicate crumb. For our chipless masterpiece, we are melting and browning the butter. This eliminates the water content, changes the protein structures, and results in a denser, much choier cookie with crispy, rippled edges and a soft, bendable center.
3. The Flavor Notes
A sugar cookie tastes predominantly like sweet vanilla and flour. A chipless cookie tastes like intense caramel, toasted nuts, toffee, and warm vanilla. It replicates the exact nostalgic experience of sneaking a spoonful of raw easy homemade cookie dough from your grandma’s mixing bowl.
The Secret Weapon: Turning Butter into Liquid Gold
If we are removing chocolate from the equation, we need to make sure the remaining ingredients are doing absolute overtime to deliver flavor. The number one secret weapon to achieving an unforgettable flavor profile in this recipe is using brown butter sugar cookies techniques.
Browning your butter (known as beurre noisette in classic French pastry cooking) takes less than ten minutes, but it completely transforms the flavor landscape of your dough. Regular butter contains about 16-18% water. When you melt it down in a saucepan, that water begins to boil off and evaporate. Once the water is gone, the milk solids drop to the bottom of the pan and begin to gently fry and toast in the hot fat.
This process triggers the Maillard reaction—the same magical chemical process that gives roasted coffee beans, seared steaks, and toasted bread their deep, intoxicating flavors. The milk solids turn a dark amber color and release an incredible aroma of roasted hazelnuts and butterscotch. By incorporating this liquid gold into our dough, we infuse every single crumb with a sophisticated, rich background note that elevates this humble treat into a gourmet dessert.
Ingredients Checklist: Everything You Need
The absolute beauty of an easy homemade cookie dough recipe is that it requires absolutely zero trips to specialty baking markets. You likely have every single one of these ingredients sitting in your kitchen pantry or refrigerator right now!
- 1 cup (2 sticks) Unsalted Butter: High-quality real butter is essential here since it provides the foundational flavor. Avoid margarine or oil substitutes at all costs!
- 2.25 cups All-Purpose Flour: Properly measured to keep our cookies thick and pillowy.
- 1 tsp Baking Soda: Our leavening agent of choice to give the cookies their gorgeous crinkled top.
- 1 tsp Fine Sea Salt: Do not skip the salt! Because this cookie is rich in brown sugar, a solid hit of sea salt is required to cut through the sweetness and balance the flavors.
- 1 cup Packed Light or Dark Brown Sugar: Dark brown sugar will yield an even chewier texture and a deeper molasses flavor; light brown sugar gives a perfect classic cookie-dough vibe.
- 1/2 cup Granulated White Sugar: To give our cookies those perfect, crisp, golden-brown edges.
- 1 Large Egg + 1 Egg Yolk: The extra egg yolk introduces extra fat and lecithin, guaranteeing an ultra-rich, fudgy center that stays soft for days.
- 1 tbsp Pure Vanilla Extract: Yes, a whole tablespoon! Since there is no chocolate to hide behind, high-quality vanilla extract acts as a co-star alongside our browned butter.
Step-by-Step Kitchen Walkthrough: Baking the Perfection
Grab a saucepan, your mixing bowls, and a sturdy spatula. Let’s walk through the exact process to get a flawless batch of chocolate chipless cookies every single time.
Step 1: Brown Your Butter
- Place your two sticks of unsalted butter into a medium, light-colored saucepan over medium heat (using a light-colored pan allows you to monitor the color changes easily so it doesn’t burn!).
- The butter will melt, then begin to crackle, bubble, and foam aggressively. This is simply the water boiling out of the fat. Stir or swirl the pan continuously.
- After about 5 minutes, the loud crackling will suddenly stop, and a thick, quiet foam will cover the surface. Look closely beneath the foam—you will see tiny specks turning a golden, toasty brown at the bottom of the pan.
- The moment you smell a rich, nutty, toffee-like aroma, immediately pull the pan off the heat and pour the liquid butter (including all those delicious dark brown specks!) into a heat-safe mixing bowl.
- Crucial Tip: Let the brown butter cool down until it is lukewarm or room temperature (about 20 minutes) before moving to the next step. If you mix hot butter with your sugars and eggs, it will melt the sugars completely and scramble your eggs, resulting in oily, flat cookies that spread into a single giant sheet pan mess.
Step 2: Combine the Dry Goods
While your liquid gold is cooling down, grab a separate medium-sized bowl and whisk together your all-purpose flour, baking soda, and fine sea salt. Ensure there are no lumps of baking soda left behind.
Step 3: Mix the Sugars and Wet Ingredients
Once your browned butter has cooled down to a comfortable lukewarm state, add your packed brown sugar and granulated white sugar directly into the bowl. Use a sturdy wooden spoon or hand mixer to blend them together. The mixture will look like thick, dark, wet sand.
Next, add your whole egg, your extra egg yolk, and that generous tablespoon of pure vanilla extract. Beat the mixture vigorously for about 1 to 2 minutes. You will notice the batter shift from a dark, grainy texture to a pale, smooth, shiny, and slightly thickened consistency. This means your sugars and fats have successfully emulsified!
Step 4: Fold in the Flour
Pour your dry flour mixture into your wet ingredients. Switch to a rubber spatula and gently fold the mixture together. Move your spatula down the center, across the bottom of the bowl, and flip the dough over, rotating the bowl as you go. Stop stirring the absolute second you can no longer see any white streaks of dry flour. Why? If you over-mix at this stage, you will over-develop the gluten proteins in the flour. This will turn your cookies tough, dense, and bread-like, destroying that delicate, melt-in-your-mouth soft and chewy chipless cookies texture we are aiming for.
Step 5: The Non-Negotiable Chill Time
I know it’s painful to wait, but this is the absolute golden rule of premium cookie baking. Cover your cookie dough bowl tightly with plastic wrap and place it into the refrigerator for at least 1.5 to 2 hours (overnight is even better!).
Because we completely melted our butter to brown it, the fat molecules are currently completely liquid. If you bake this dough right now, the cookies will instantly flatten out into thin, greasy pancakes in the hot oven. Chilling solidifies the fat again, ensuring a thick bake. Furthermore, this resting period allows the flour to completely absorb the moisture from the eggs and sugars, resulting in a much deeper, highly concentrated caramel flavor profile.
Step 6: Scoop, Shape, and Bake
- Preheat your oven to 350°F (175°C) and line two large baking sheets with parchment paper or silicone baking mats.
- Remove your chilled dough from the fridge. Use a large cookie scoop (about 2 tablespoons per cookie) to portion out the dough. Roll the portions gently between your palms to form smooth, uniform balls.
- Place the dough balls onto your prepared baking sheets, leaving about 2 inches of space between each cookie so they have room to gracefully spread.
- Pop them into the center rack of your oven and bake for 9 to 11 minutes.
- The Visual Cue: You want to pull them out when the edges are a beautiful light golden brown and look set, but the absolute center still looks pale, puffy, and slightly under-baked. They will look like they aren’t fully cooked in the middle—trust the process! They will continue to firm up on the hot baking sheet outside the oven through residual heat cooking. This is the ultimate secret to preserving a fudgy, gooey center.
Let them sit undisturbed on the hot baking sheet for 5 minutes, then use a spatula to carefully transfer them to a wire rack to cool completely.
Pro-Tips for Bakery-Quality Chipless Cookies
Want to take your cookies for chocolate haters or cookie-dough enthusiasts to an absolute professional level? Keep these three industry-insider tricks up your sleeve:
1. The “Spoon and Level” Method
The absolute number one reason home bakers end up with dry, cakey, or chalky cookies is that they measure their flour incorrectly. If you scoop your measuring cup directly into a bag of packed flour, you are accidentally packing up to 25% more flour than the recipe requires! Instead, use a spoon to gently fluff your flour inside the container, spoon it loosely into your measuring cup until it overflows, and use the flat back of a butter knife to sweep away the excess.
2. The “Cookie Scoot” Trick
Have you ever wondered how professional food bloggers get those perfectly circular, symmetrical cookies with beautiful rippled edges? Try the cookie scoot! The exact second your cookies come out of the oven while they are still incredibly hot and soft, place a large round cookie cutter or the opening of a large glass completely over a cookie. Gently move the glass in rapid circular motions on the pan, swirling the cookie inside it. The hot edges will strike the circular walls, neatly tucking any stray dough back into a flawless, bakery-style circle.
3. Add a Touch of Flaky Sea Salt
Because these cookies celebrate the natural caramel and toffee notes of brown sugar and butter, adding a light finish of flaky sea salt (like Maldon salt) right as they come out of the oven is an absolute game-changer. The large, crunchy salt flakes enhance the sweetness, cut through the rich fat of the browned butter, and give your dessert an instantly sophisticated, gourmet finish.
Customizing Your Chipless Dough: Endless Variations
While this Chocolate Chipless Cookies recipe is an absolute masterpiece in its pure, unadulterated form, it also serves as an incredible canvas for alternative mix-ins if you want to experiment in your kitchen! Here are some fabulous ideas that don’t involve chocolate chunks:
- The Sweet & Salty Pretzel Twist: Fold in 1/2 cup of crushed salted pretzels right before chilling the dough for an incredible texture and flavor contrast.
- The Ultimate Toffee Crunch: Add 1/2 cup of Heath bar toffee bits into the dough to double down on that rich, buttery caramel flavor profile.
- The Triple Nut Deluxe: If you love texture but hate chocolate, add a mix of chopped toasted pecans, walnuts, and white macadamia nuts for an earthy, satisfying crunch.
- The Cinnamon-Sugar Swirl: Roll your dough balls in a mix of cinnamon and sugar right before baking to give them a fun, snickerdoodle-inspired twist.
Storage, Freezing, and Make-Ahead Playbook
One of the greatest things about this specific dough composition is how beautifully it stores. You can easily keep a batch on hand so you are always less than fifteen minutes away from a warm, comforting treat.
How to Keep Baked Cookies Soft for Days
Store your completely cooled cookies in a tightly sealed airtight container at room temperature. They will stay incredibly soft and chewy for up to 5 days.
- Natasya’s Secret Hack: Toss a single slice of ordinary white sandwich bread into the container alongside your cookies! The cookies will naturally absorb the moisture from the bread like a sponge, keeping them pillowy-soft and fresh while the piece of bread turns completely rock-solid.
Freezing Raw Dough for Instant Cravings
This recipe is a stellar candidate for your freezer!
- Follow the recipe all the way through scooping and rolling the dough into uniform balls.
- Place the dough balls close together (but not touching) onto a parchment-lined baking sheet and freeze them for exactly 1 hour until they are frozen solid.
- Transfer the frozen dough balls into a heavy-duty, zip-top freezer bag. They will keep perfectly for up to 3 months!
- When a cookie craving strikes on a rainy evening, simply place a few frozen dough balls onto a baking sheet and bake them straight from the freezer at 350°F (175°C). Just add an extra 1 to 2 minutes to the total baking time to compensate for the frozen core!
Frequently Asked Questions (FAQ)
Can I use regular melted butter instead of browning it?
Yes, you can absolutely use standard melted butter if you are in a massive rush! However, keep in mind that you will be missing out on those incredible, deep toffee and nutty background notes that make this recipe so uniquely delicious. If you skip browning, decrease your flour by 1 tablespoon to compensate for the water that didn’t evaporate.
Why did my cookies turn out completely flat and run together?
Flat cookies are almost always caused by an incorrect fat temperature. If your browned butter was still warm or hot when you mixed it with the sugars and eggs, it dissolved the sugar structures completely. Alternatively, skipping the mandatory 2-hour refrigerator chill time will cause the fat to melt instantly in the oven heat before the flour has a chance to set up its structure.
Is it safe to eat this raw cookie dough?
Because this dough contains raw flour and raw eggs, it is not safe to consume raw as-is. Raw flour can harbor bacteria, and raw eggs carry a risk of salmonella. If you are specifically craving edible raw cookie dough, you need a recipe that omits eggs completely and utilizes heat-treated flour!
Can I use self-rising flour instead of all-purpose?
I do not recommend using self-rising flour for this recipe. Self-rising flour contains a pre-mixed amount of baking powder and salt that is formulated for fluffy cakes and biscuits. For a chewy, dense cookie texture, we specifically need the distinct chemical reaction of baking soda combined with our brown sugar molasses.
Final Thoughts: The Purist’s Cookie Choice
At the end of the day, baking is all about customizing your food to bring you the maximum amount of joy. For too long, dough purists have had to suffer through picking chocolate chips out of their desserts or feeling guilty for preferring the golden-brown base over the actual toppings.
These Chocolate Chipless Cookies stand proudly on their own. They prove that when you use high-quality butter, perfectly balanced brown sugars, a heavy hand of premium vanilla, and proper scientific baking techniques, you don’t need any candy or chocolate chunks to create an absolutely unforgettable culinary experience.
The warm, buttery, caramelized aroma that will fill your home as these bake is better than any scented candle money can buy. It is the ultimate comfort food—best enjoyed warm with a cold glass of milk, a hot cup of tea, or simply shared with the true dough lovers in your life.
So, go preheat your oven, brown that butter, and finally enjoy the pure cookie dough experience you’ve been dreaming of.
Happy baking, everyone! 🍪✨