
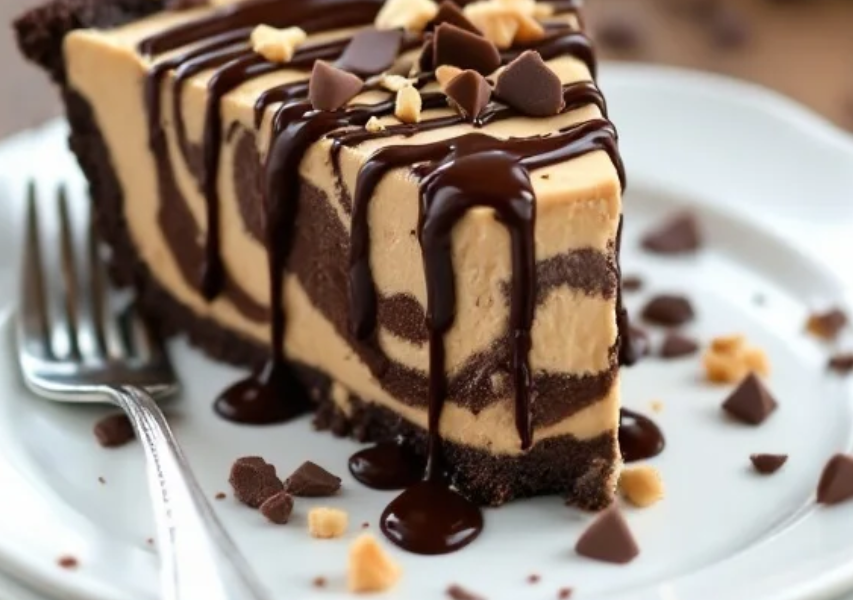
The Ultimate Decadent Chocolate Peanut Butter Swirl Pie: A Slice of Heaven
Let’s be completely real for a moment: is there any flavor combination on planet Earth that is better than chocolate and peanut butter? I honestly don’t think so. It is the culinary equivalent of a perfect marriage. The deep, slightly bitter, rich notes of chocolate perfectly contrast with the salty, nutty, creamy, and sweet profile of peanut butter. It is a flavor dynamic that has captured our hearts since we were kids eating peanut butter cups, and it only gets better as we grow up.
If you are a hardcore fan of this legendary duo, you need to drop whatever you are doing right now. I am about to introduce you to your new dessert obsession: the Decadent Chocolate Peanut Butter Swirl Pie.
This isn’t just any ordinary pie. This is a show-stopping, jaw-dropping, “please-give-me-the-recipe” kind of pie. Imagine a thick, buttery, dark chocolate cookie crust holding up a mountain of ultra-fluffy, mousse-like peanut butter filling. Now, imagine a rich, glossy chocolate ganache folded beautifully throughout that filling, creating a mesmerizing marbled swirl in every single slice. It looks like it belongs in the pastry case of a high-end bakery, but the best part? It is shockingly easy to make at home.
In this comprehensive guide, we are going to dive deep into every single element of this no-bake chocolate peanut butter pie. We will cover the science of getting the perfect fluffy texture, the secret to a crust that doesn’t crumble apart, and the technique for getting that gorgeous, magazine-worthy swirl. Grab your mixing bowls, because we are about to make dessert history!
Why This Pie is the Ultimate Dessert for Peanut Butter Lovers
When you are looking for an easy dessert for peanut butter lovers, you often run into a few common problems. Sometimes the desserts are too heavy and dense, leaving you feeling like you just ate a brick of pure sugar. Other times, the peanut butter flavor gets completely lost behind too much chocolate or a soggy crust.
This decadent peanut butter pie recipe solves all of those issues through a masterclass in texture and balance. Here is why this pie stands head and shoulders above the rest:
1. The Texture is Pure Cloud-Like Perfection
We aren’t making a dense, sticky block of peanut butter here. By folding freshly whipped heavy cream into a base of softened cream cheese and peanut butter, we aerate the mixture. The result is a filling that feels as light as a feather on your tongue but still delivers a massive punch of rich, nutty flavor. It melts in your mouth instantly.
2. It’s Mostly No-Bake (The Best Kind of Baking!)
Nobody wants to turn on their oven for an hour when they are craving a sweet treat. Aside from a very quick trip to the oven for the crust (which is technically optional, but highly recommended for crunch!), this entire pie comes together in your fridge. It is the ultimate make-ahead dessert for parties, holidays, or lazy weekend cravings.
3. The Chocolate Ganache Swirl is a Game Changer
Instead of just putting chocolate on the bottom or chocolate on the top, we are swirling a homemade chocolate ganache directly into the peanut butter filling. This means that every single bite you take will have the exact perfect ratio of chocolate to peanut butter. Plus, it looks absolutely stunning when you slice into it.
Breaking Down the Layers: The Ingredients You Need
To build a skyscraper of flavor, you need a solid foundation. Let’s look at the three main components of our creamy chocolate peanut butter dessert and the exact ingredients you need for each. Quality matters here, so let’s choose our ingredients wisely!
Part 1: The Dark Chocolate Cookie Crust
A great pie needs a great crust. While a traditional graham cracker crust is nice, we need chocolate to balance the massive amount of peanut butter in the filling.
- Chocolate Sandwich Cookies (like Oreos): You need about 24 whole cookies. Do not remove the cream filling! The cream acts as a secondary binder and adds sweetness.
- Unsalted Butter: Melted. This is the glue that will hold your cookie crumbs together. We use unsalted so the crust doesn’t become overly salty.
Part 2: The Fluffy Peanut Butter Filling
This is the heart and soul of the pie. It needs to be rich, tangy, sweet, and airy all at the same time.
- Cream Cheese: 1 block (8 oz), full fat, and softened to room temperature. This provides a slight tang that cuts through the sweetness and gives the pie a cheesecake-like stability.
- Creamy Peanut Butter: 1 full cup. Crucial Note: Do NOT use natural peanut butter (the kind where the oil separates at the top). You need a standard, commercial creamy peanut butter (like Jif or Skippy) because the stabilizers in it are required to keep the pie from turning into a melty, oily mess in the fridge.
- Powdered Sugar: 1 cup. We use powdered sugar instead of granulated because it dissolves instantly and contains a tiny bit of cornstarch, which helps stabilize the filling.
- Vanilla Extract: 1 tablespoon. Vanilla enhances the nutty flavors beautifully.
- Heavy Whipping Cream: 1.5 cups, cold. This will be whipped into stiff peaks and folded in to create that heavenly, mousse-like texture.
Part 3: The Rich Chocolate Ganache Swirl
This isn’t just melted chocolate; it’s a ganache, which means it stays soft and fudgy even when cold, rather than turning into hard, impossible-to-cut shards inside your pie.
- Semi-Sweet Chocolate Chips: 1 cup. Semi-sweet provides the perfect balance. Milk chocolate makes the pie too sweet, while dark chocolate can be too bitter for some.
- Heavy Cream: 1/2 cup. Heated and poured over the chocolate to create the ganache.
Step-by-Step Kitchen Walkthrough: Making the Magic Happen
Now that we have our ingredients, it is time to assemble this masterpiece. Read through these steps carefully before you start so you know exactly what the game plan is!
Step 1: Build the Ultimate Oreo Crust
First, we need to create our vessel.
- Place your chocolate sandwich cookies (cream and all) into a food processor. Pulse them until they are completely crushed into fine crumbs. If you don’t have a food processor, put them in a heavy-duty zip-top bag and smash them with a rolling pin!
- Pour the crumbs into a medium bowl and add your melted butter. Stir it around with a fork until the mixture looks like wet sand.
- Pour the mixture into a 9-inch pie dish. Use the bottom of a flat measuring cup or glass to press the crumbs firmly and evenly across the bottom and up the sides of the dish.
- To Bake or Not to Bake? You can pop this crust in the fridge to set, but for the absolute best, crunchiest texture that won’t fall apart when you slice it, bake the crust at 350°F (175°C) for exactly 8 minutes. Let it cool completely before adding any filling.
Step 2: Prepare the Chocolate Ganache
We need to make this now so it has time to cool down slightly before we swirl it.
- Place your semi-sweet chocolate chips in a heat-proof glass or metal bowl.
- In a small saucepan (or in the microwave), heat your 1/2 cup of heavy cream just until it begins to gently simmer. Do not let it boil vigorously!
- Pour the hot cream directly over the chocolate chips. Let it sit completely untouched for 3 minutes.
- After 3 minutes, take a whisk and gently stir the mixture in small circles in the center of the bowl, gradually moving outward. It will magically come together into a dark, glossy, silky chocolate ganache. Set it aside to cool to room temperature.
Step 3: Whip the Heavy Cream
In a clean, chilled bowl, pour in your 1.5 cups of cold heavy whipping cream. Use a hand mixer or a stand mixer with the whisk attachment to beat the cream on high speed until stiff peaks form. How to check for stiff peaks: When you lift the whisk straight out of the bowl and turn it upside down, the peak of the cream should stand straight up without drooping. Be careful not to over-whip, or it will turn into butter! Set the whipped cream aside in the fridge.
Step 4: Create the Peanut Butter Base
In a separate, large mixing bowl, add your softened cream cheese and creamy peanut butter. Use your mixer (you don’t need to wash the beaters from the cream!) to beat them together on medium speed until they are completely smooth and combined. Add the powdered sugar and vanilla extract, and beat again until the mixture is thick, creamy, and free of any lumps. Scrape down the sides of the bowl with a rubber spatula to make sure everything is incorporated.
Step 5: The Folding Technique
This is the most critical step for the texture of your Oreo crust peanut butter pie. Take your chilled whipped cream and add about one-third of it to your heavy peanut butter mixture. Gently stir it in to lighten the base. Now, add the rest of the whipped cream. Switch to a rubber spatula and fold it in. To fold, cut straight down the middle of the mixture with the edge of your spatula, scrape across the bottom of the bowl, and lift the mixture up and over. Rotate the bowl and repeat. Do this gently until no white streaks of cream remain. You want to keep as much air in the filling as possible!
Step 6: The Art of the Swirl
Now comes the fun part!
- Pour exactly half of your fluffy peanut butter filling into your cooled chocolate crust. Spread it out evenly.
- Take your cooled chocolate ganache and drizzle about half of it all over the peanut butter layer.
- Top with the remaining peanut butter filling, spreading it carefully to the edges.
- Drizzle the rest of the chocolate ganache in dollops or lines across the top of the pie.
- Take a butter knife or a wooden skewer, dip it deep into the pie, and drag it through the filling in figure-eight motions and looping circles. Don’t overdo it! If you swirl too much, it will just turn into light brown mush. You want distinct ribbons of dark chocolate running through the peanut butter.
Step 7: Chill and Exercise Patience
I know you want to eat it right now, but you must resist! The pie is currently too soft to slice cleanly. Place the entire pie into the refrigerator and let it chill uncovered for at least 6 hours, though overnight is highly recommended. The cream cheese and chocolate need this time to firm up and set the pie into sliceable perfection.
Pro-Tips for the Best Peanut Butter Pie Experience
Even an easy dessert for peanut butter lovers can benefit from a few professional bakery secrets. Keep these tips in mind to ensure your pie turns out absolutely flawless.
1. Temperature is Everything
Your cream cheese must be genuinely softened to room temperature before you begin. If it is still cold, it will leave tiny, unappetizing white lumps in your peanut butter filling that are impossible to beat out. Take it out of the fridge at least two hours before you plan to bake. Conversely, your heavy cream must be ice cold. Warm cream will not whip properly and will not hold the air needed to make the filling light and fluffy.
2. Slicing Like a Pro
Because this decadent peanut butter pie recipe is rich and sticky, cutting it can get messy. For gorgeous, clean slices that show off your beautiful swirl, run a sharp chef’s knife under very hot water for a few seconds. Wipe the blade completely dry with a towel, and immediately make a slice while the blade is still hot. Clean the knife, heat it again, and dry it before making the next cut. The hot blade will glide right through the chilled chocolate ganache!
3. Take it to the Next Level with Toppings
While this pie is a masterpiece on its own, you can absolutely dress it up for a special occasion. Right before serving, try adding some of these toppings:
- Chopped Peanut Butter Cups: A classic addition for extra texture.
- Crushed Pretzels: For an incredible salty crunch that balances the sweetness perfectly.
- Flaky Sea Salt: A light sprinkle of Maldon sea salt over the top of the pie elevates the chocolate flavor and makes it taste like a gourmet salted caramel-style dessert.
- Extra Whipped Cream: Pipe some fresh rosettes of whipped cream around the border of the pie for a beautiful, classic presentation.
Storage, Freezing, and Make-Ahead Guidelines
One of the biggest advantages of this Chocolate Peanut Butter Swirl Pie is its incredible shelf life. It is the perfect dessert to make in advance when you are hosting a dinner party and don’t want to stress about cooking on the day of the event.
Storing in the Refrigerator
Once the pie has fully set, cover it loosely with plastic wrap or place it in a pie keeper. It will stay fresh and delicious in the refrigerator for up to 4 to 5 days. The crust will slowly soften over time, but the flavor will actually deepen as it sits!
Can You Freeze This Pie?
Absolutely! In fact, many people prefer eating this pie frozen, as it takes on the texture of a rich, premium ice cream cake. To freeze, let the pie set completely in the fridge first. Then, wrap the entire pie dish tightly in a double layer of plastic wrap, followed by a layer of aluminum foil to prevent freezer burn. It will keep beautifully in the freezer for up to 2 months.
When you are ready to serve it, you have two options:
- Serve it Frozen: Let it sit on the counter for about 10-15 minutes just to soften enough to get a knife through it, then serve it as a frozen treat.
- Serve it Chilled: Transfer the pie from the freezer to the refrigerator the night before you plan to serve it so it can gently thaw back to its original mousse-like texture.
The Verdict on This Decadent Masterpiece
Baking and dessert-making should be fun, rewarding, and ultimately, delicious. This Chocolate Peanut Butter Swirl Pie hits every single one of those marks. It combines the nostalgic, comforting flavors of our favorite childhood candies with the elegant, sophisticated presentation of a true gourmet tart.
By utilizing the simple techniques of whipping air into heavy cream and melting a quick two-ingredient ganache, you are able to create a dessert that tastes like it required hours of laborious pastry work, when in reality, it took less than thirty minutes of active kitchen time.
Whether you are making this for a holiday dinner, a summer barbecue, a birthday celebration, or just a random Tuesday night because you deserve a treat, this pie is guaranteed to steal the show. The crunchy, buttery chocolate cookie crust, the impossibly light and airy peanut butter filling, and those thick ribbons of rich, dark chocolate ganache running through every single bite—it is a symphony of flavor and texture.
So, don’t wait for a special occasion. Add cream cheese, heavy cream, and peanut butter to your grocery list today, and get ready to experience the most incredible, creamy chocolate peanut butter dessert you have ever tasted.
Happy no-baking, friends! May your crusts be crunchy, your filling be fluffy, and your chocolate swirls be absolutely picture-perfect!