
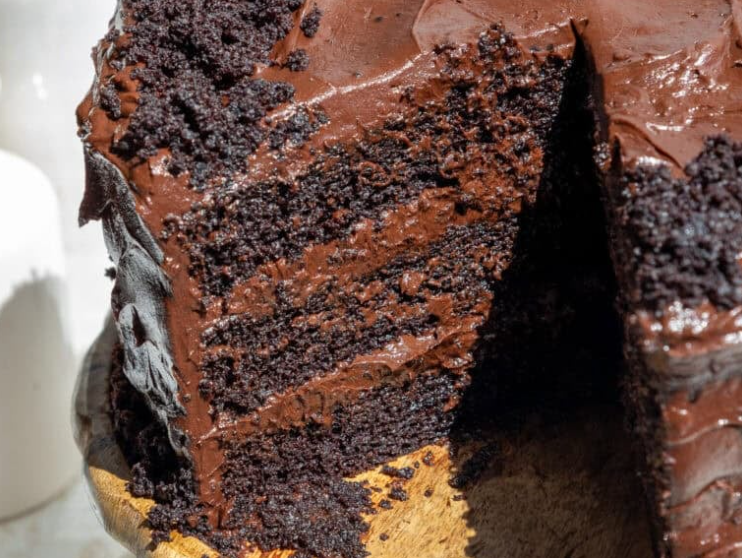
The Ultimate Death by Chocolate Cake: A Masterclass in Pure Indulgence
Listen, if you are on a diet, look away right now. Close the tab. Walk away from the screen. Because today, we are diving headfirst into a pool of pure, unadulterated chocolate decadence. We are talking about the legendary Death by Chocolate Cake.
If you have been searching high and low for the best chocolate cake recipe on the internet, congratulations—you can stop scrolling. You’ve officially found it. This isn’t just a regular cake; it is a towering, four-layer masterpiece of a decadent chocolate dessert that will make you the absolute hero of any party, birthday, or weekend cheat meal.
We are not taking any shortcuts here. No boxed cake mixes, no tubbed frosting from the grocery store. We are building this gorgeous ultimate chocolate layer cake completely from scratch. Don’t let the multi-layered look intimidate you, either! Whether you are a seasoned pro or looking for layer cake tips for beginners, I am going to break this recipe down step-by-step so your cake turns out flawlessly moist, intensely fudgy, and stunningly beautiful.
Let’s grab our aprons, turn up the music, and talk about what makes this cake a total game-changer.
The Anatomy of a “Death by Chocolate” Masterpiece
Before we start cracking eggs, let’s talk about what actually goes into a Death by Chocolate Cake. To earn this title, a cake can’t just have chocolate batter. It needs layers of flavor and different textures of chocolate hitting your palate all at once.
Here is what we are building today:
- The Fudgy Chocolate Cake Layers: Deep, dark, and incredibly soft. We use an oil-based batter with a secret weapon ingredient to guarantee a moist chocolate cake from scratch.
- The Rich Chocolate Buttercream: A silky, velvety American buttercream infused with real melted chocolate and Dutch-process cocoa powder. It’s sweet, but it has enough bitter chocolate depth to stay perfectly balanced.
- The Glossy Chocolate Ganache Drip: The crowning glory. A smooth, shiny river of chocolate cascading down the sides of the cake.
- The Textural Garnishes: Mini chocolate chips between the layers for a subtle crunch, topped with chocolate curls, chunks, or truffles.
When you combine all four elements, you get a symphony of textures—fluffy, creamy, snappy, and smooth. It’s the ultimate dream for anyone with a serious sweet tooth.
The Science: Why This Cake Stays Incredibly Moist
Have you ever baked a chocolate cake, waited patiently for it to cool, taken a bite, and realized it tasted like… sweetened cardboard? It is heartbreaking. The culprit is almost always a lack of proper moisture balance or over-baking.
Chocolate is naturally drying. Cocoa powder acts like flour in a recipe; it absorbs liquids. If you make a cake using only butter and cocoa powder, it can turn dry very quickly if it spends even two minutes too long in the oven.
To combat this and ensure a fudgy chocolate cake every single time, this recipe relies on two key components: oil and acidic dairy.
- Why Oil Over Butter? Butter tastes amazing, don’t get me wrong. But butter is solid at room temperature and contains water that evaporates during baking. Oil, on the other hand, remains a liquid at room temperature. This means an oil-based cake will always feel softer and noticeably moister on your tongue, even after sitting in the fridge.
- The Power of Buttermilk (or Sour Cream): Acidic dairy breaks down the gluten strands in the flour, resulting in a cake crumb that is tender and delicate rather than chewy. Plus, it adds a subtle tang that cuts through the intense sweetness of the sugars.
The Ultimate Ingredient Breakdown
To make the best chocolate cake recipe, you need to understand your ingredients. Let’s look at the grocery list and discuss why each item is vital for this ultimate chocolate layer cake.
For the Cake Layers:
- All-Purpose Flour: Just classic flour. No need for fancy cake flour here; all-purpose gives us the structure we need to stack four heavy layers without the cake collapsing.
- Granulated Sugar & Light Brown Sugar: Yes, we are using both! Granulated sugar provides sweetness and helps the cake rise, while brown sugar brings molasses to the party, adding depth of flavor and locking in moisture.
- Dutch-Process Cocoa Powder: This is non-negotiable for a true Death by Chocolate Cake. Dutch-process cocoa has been treated with an alkalizing agent to reduce its natural acidity. The result? A smoother, darker, and much more intensely chocolatey flavor than regular natural cocoa powder.
- Baking Powder & Baking Soda: Our leavening tag-team. They react with the buttermilk to create tiny air bubbles, making the cake light and fluffy instead of a dense brick.
- Fine Sea Salt: Never skip salt in baking! Salt acts as a flavor magnifier. Without it, your chocolate will taste flat and one-dimensional.
- Large Eggs (Room Temperature): Eggs bind everything together and provide structure. Make sure they are at room temperature so they emulsify perfectly into the batter without seizing up your oil or dairy.
- Buttermilk: For that ultra-tender crumb we talked about. If you don’t have buttermilk, you can make a quick DIY version by adding one tablespoon of lemon juice or white vinegar to a cup of whole milk and letting it sit for five minutes.
- Vegetable Oil or Canola Oil: For long-lasting, superior moisture.
- Pure Vanilla Extract: It might sound weird to put vanilla in a chocolate cake, but vanilla actually enhances the natural flavor notes of the cocoa beans.
- Hot Brewed Coffee or Boiling Water: The ultimate baker’s secret. Pouring hot liquid into your chocolate cake batter at the very end “blooms” the cocoa powder. The heat dissolves the cocoa crystals, releasing an incredibly deep, rich aroma and flavor. Don’t worry—your cake won’t taste like coffee at all! It just makes the chocolate taste ten times more like chocolate.
For the Rich Chocolate Buttercream:
- Unsalted Butter (Softened): Make sure your butter is at room temperature. It should be soft enough to leave a thumbprint but not so warm that it’s shiny or melting.
- Powdered Sugar (Confectioners’ Sugar): For structure, thickness, and sweetness.
- Dutch-Process Cocoa Powder: To give the buttercream its baseline chocolate flavor.
- Melted Dark Chocolate (Cooled): Adding real melted chocolate (around 50% to 60% cacao) into your buttercream elevates it from standard frosting to a luxurious, fudge-like experience.
- Heavy Cream: To thin out the frosting and whip it into a cloud-like, spreadable consistency.
- A Pinch of Salt: To keep the sweetness in check.
Step-by-Step Guide: Baking the Perfect Chocolate Layers
Alright, let’s get our hands dirty. Follow these steps carefully to ensure your cake layers come out flat, moist, and ready for stacking.
Step 1: Prep Like a Pro
Preheat your oven to 350°F (175°C). Line four 8-inch round cake pans with parchment paper circles at the bottom, and grease the sides generously with butter or non-stick baking spray.
Natasya’s Golden Rule: If you want perfectly even layers without huge domes on top, invest in a set of cake strips. Soak these fabric strips in water and wrap them around the outside of your cake pans before putting them in the oven. They keep the edges of the pan cooler, allowing the entire cake to rise at the exact same rate. No more carving off half your cake to level it!
Step 2: Combine the Dry Ingredients
In a massive mixing bowl, sift together your all-purpose flour, granulated sugar, brown sugar, Dutch-process cocoa powder, baking powder, baking soda, and sea salt. Give it a thorough whisk to ensure there are no clumps of cocoa or baking soda left behind.
Step 3: Add the Wet Ingredients
Add your room-temperature eggs, buttermilk, vegetable oil, and vanilla extract directly into the dry mixture. Using a hand mixer or a stand mixer fitted with the paddle attachment, beat on medium speed for about two minutes. The batter will look incredibly thick, dark, and shiny at this stage. Scrape down the sides of the bowl with a rubber spatula to make sure no dry pockets of flour are hiding at the bottom.
Step 4: Bloom the Cocoa
Turn your mixer down to the absolute lowest speed. Slowly and carefully pour in the hot brewed coffee or boiling water. The batter will instantly thin out until it looks almost like chocolate milk. This is exactly what you want! Don’t panic; a thin batter means a beautifully light, moist cake. Mix just until the liquid is fully incorporated.
Step 5: Divide and Bake
Carefully divide the batter equally among your four prepared pans. If you want to be super precise, use a digital kitchen scale to weigh each pan so your layers are identical in thickness.
Pop them into the preheated oven and bake for 22 to 26 minutes. You’ll know they are ready when a toothpick inserted into the dead center comes out clean or with a few moist crumbs attached.
Step 6: The Cooling Process
This is where patience comes in. Let the cakes sit in their pans on a wire rack for 15 minutes. Once the pans are safe to touch, gently run a butter knife around the edges, flip the cakes out onto the wire racks, peel off the parchment paper, and let them cool completely.
Pro-Tip: Trying to frost a warm cake is a recipe for disaster. Your buttercream will melt, and your beautiful tower will turn into a leaning tower of sadness. For the absolute best results, wrap the cooled layers in plastic wrap and place them in the fridge for at least an hour before assembling. Chilled cake layers are much firmer and produce far fewer crumbs when you frost them!
Making the Dreamy Chocolate Buttercream
While your cake layers are chilling out in the fridge, it’s time to make the component that holds this entire decadent chocolate dessert together: the frosting.
The Method:
- Melt the Chocolate: Melt your dark chocolate chips or chopped chocolate bars in a microwave-safe bowl in 30-second bursts, stirring in between until completely smooth. Set it aside to cool down to room temperature. It needs to be liquid but not hot.
- Beat the Butter: Place your softened butter into a clean mixing bowl. Beat it on medium-high speed for a full 3 minutes until it looks pale, creamy, and incredibly fluffy.
- Add the Cocoa: Sift in your cocoa powder and add the pinch of salt. Mix on low until combined, then scrape down the bowl.
- The Sugar Dance: Alternately add the powdered sugar and the heavy cream in small batches. Mix on low speed so you don’t end up covered in a cloud of sugar dust!
- The Chocolate Explosion: Once all the sugar is in, pour in the cooled, melted dark chocolate. Turn the mixer up to medium-high speed and let it whip for another 2 to 3 minutes. The buttercream will transform into a gorgeous, glossy, deep brown frosting that tastes exactly like chocolate fudge.
If it feels too thick, add another splash of heavy cream. If it feels too soft, add a few more tablespoons of powdered sugar.
The Assembly: Building Your Chocolate Fortress
Now comes the most exciting part: putting together your Death by Chocolate Cake. Grab a cake board or your favorite serving platter, and let’s build a masterpiece.
Step 1: The Anchor
Smear a small dollop of chocolate buttercream right in the center of your cake board or platter. This acts as “glue” so your cake doesn’t slide around while you are trying to decorate it. Place your first cake layer down, top-side up.
Step 2: Layering and Texture
Scoop a generous cup of buttercream onto the first layer. Spread it out evenly using an offset spatula until it reaches the edges.
Now, for a fun textural surprise, sprinkle a handful of mini chocolate chips or finely chopped chocolate chunks over the buttercream. Press them down gently into the frosting so they stay put. Place the second cake layer directly on top, and repeat the process until all four layers are stacked.
Tip: For the very top layer, place it upside down (bottom-side up). The bottom of a cake layer is always perfectly flat, which gives you a sharp, professional top edge with zero crumbs!
Step 3: The Crumb Coat (The Ultimate Layer Cake Tip for Beginners)
Don’t try to make the cake look perfect on the first go. Instead, spread a very thin layer of buttercream over the top and all around the sides of the cake. This is called a crumb coat. It acts like a primer, sealing in all those loose chocolate crumbs so they don’t ruin your final design.
Once the cake is lightly covered, pop it back into the fridge for 20 to 30 minutes until the crumb coat feels firm to the touch.
Step 4: The Final Coat
Now that your crumbs are locked down, spread the remaining buttercream generously over the top and sides of the cake. Use a cake scraper or a large offset spatula to smooth out the edges. If you like a rustic look, you can use the back of a spoon to create beautiful swirls in the frosting!
The Showstopper: The Perfect Chocolate Ganache Drip
Nothing says “gourmet bakery” quite like a flawless chocolate ganache drip. It looks incredibly impressive, but it is actually one of the easiest decorating techniques to master.
The Magic Ratio:
To get a drip that runs beautifully down the cake without pooling at the bottom, you need a 1:1 ratio of chocolate to heavy cream by weight.
- Ingredients: 4 ounces of chopped semi-sweet chocolate + 4 ounces of heavy whipping cream.
- The Method: Place your chopped chocolate into a heat-proof bowl. Heat your heavy cream in a small saucepan just until it begins to simmer (do not let it boil!). Pour the hot cream over the chocolate and let it sit undisturbed for 2 minutes.
- The Stir: Using a rubber spatula, slowly stir the mixture starting from the center and working your way out. At first, it will look curdled and strange, but suddenly it will come together into a shiny, silky, dark liquid. Let it cool on the counter for about 10-15 minutes until it is just slightly warm to the touch. It should be the consistency of warm honey.
Applying the Drip:
Take your chilled cake out of the fridge. Using a spoon or a plastic squeeze bottle, apply the ganache along the top edge of the cake, gently nudging small amounts over the side to create the drips. Space them out randomly for a natural, beautiful look. Once you’ve done the perimeter, pour the remaining ganache into the center of the top of the cake and spread it out smoothly with your offset spatula.
The Finishing Touches
Your cake is now covered in glossy ganache, but we aren’t done yet. This is a Death by Chocolate Cake, remember? We need to go all out on the decorations.
While the ganache is still slightly tacky, decorate the top border of your cake. You can pipe beautiful swirls of the remaining chocolate buttercream using an open-star piping tip (like a 1M tip). Nestled inside those buttercream swirls, you can add:
- Store-bought chocolate truffles (like Lindor or Ferrero Rocher).
- Homemade chocolate curls (made by running a vegetable peeler along the edge of a room-temperature chocolate bar).
- A sprinkle of flaky sea salt to make the chocolate flavors pop even more.
- Chocolate sprinkles or crushed Oreo cookies around the bottom border of the cake.
Once you are done decorating, step back and admire your creation. You just built an absolute masterpiece of a cake!
Troubleshooting Common Cake Disasters
Even the best bakers run into hiccups sometimes. If things aren’t going perfectly according to plan, don’t stress! Here is how to fix the most common layer cake issues:
1. “My cake layers sank in the middle!”
- Why it happened: This usually happens if the oven door was opened too early during baking, letting out the trapped heat, or if the baking soda/powder was expired.
- The Fix: Don’t worry! You can easily level the tops of the cakes with a serrated bread knife to remove the uneven sections. When you stack the cake, you can fill that central cavity with extra chocolate buttercream or a dollop of leftover ganache. No one will ever know.
2. “My buttercream looks curdled or grainy!”
- Why it happened: Your butter was likely too cold, or the melted chocolate was too hot when you poured it into the butter mixture, causing things to separate.
- The Fix: Take a warm kitchen towel (microwaved for a few seconds) and wrap it around the bottom of your mixing bowl while beating the frosting on high speed. The gentle warmth will help re-emulsify the fats and sugars, turning it silky smooth again.
3. “The ganache drip melted all my frosting!”
- Why it happened: The ganache was too hot when you poured it, or the cake hadn’t been chilled long enough.
- The Fix: Pop the entire cake into the fridge immediately to stop the melting process. Once it’s completely cold, you can camouflage any messy areas by adding chocolate curls or extra frosting swirls over the top. Remember, a messy cake still tastes absolutely incredible!
How to Properly Store and Freeze Your Cake
Because this cake is so rich and massive, you will likely have leftovers (unless you are feeding a small army of chocoholics!). Here is the best way to keep your cake tasting fresh for days:
- At Room Temperature: If your house isn’t too hot, the cake can stay under a cake dome or wrapped loosely in plastic wrap at room temperature for up to 3 days. The high sugar content in the buttercream acts as a natural preservative for the dairy.
- In the Fridge: If you prefer your cake cold or live in a humid climate, store it in the fridge for up to 6 days.
- Natasya’s Tip: Cut slices will dry out quickly where the cake interior is exposed to the air. Press a piece of plastic wrap or wax paper directly against the cut surface of the cake to keep it moist!
- Freezing Instructions: This cake freezes beautifully! You can freeze individual slices by wrapping them tightly in plastic wrap and then a layer of aluminum foil. Whenever you want a decadent chocolate dessert, just pull a slice out of the freezer, let it thaw on the counter for 30 minutes, or microwave it for 15 seconds for a warm, molten-fudge experience.
The Verdict: The Chocolate Cake of Your Dreams
There you have it—a complete masterclass on how to create the absolute ultimate Death by Chocolate Cake entirely from scratch. It’s rich, it’s intense, it’s dramatic, and it is worth every single calorie.
Baking an ultimate chocolate layer cake like this takes time and patience, but the look on your friends’ and family’s faces when you slice into those gorgeous, dark layers makes it all worthwhile. It is the ultimate expression of love through food.
So, clear your schedule for the afternoon, head to the store to gather your high-quality cocoa powder and chocolates, and let’s turn your kitchen into a world-class bakery.
Happy baking, everyone! May your drips be smooth and your cravings satisfied! 🍫🎂✨