
The Ultimate Guide to Perfect Grilled Octopus (Never Rubbery, Always Tender!)
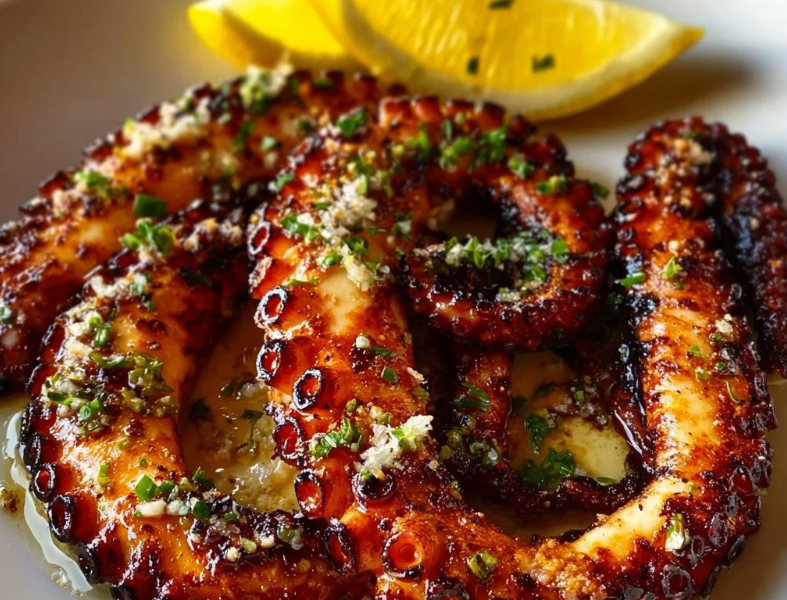
Let’s be completely honest for a second: ordering grilled octopus at a high-end Mediterranean restaurant feels incredibly fancy. The tentacles arrive at your table beautifully charred, smoky, crisp on the outside, and so tender on the inside that your knife slides through them like butter. It’s a culinary masterpiece.
But have you ever thought about making it at home, only to immediately back down in absolute terror?
You are definitely not alone. Octopus is one of those mysterious seafood items that scares the living daylights out of home cooks. We’ve all heard the horror stories—or worse, experienced them firsthand. You buy an expensive seafood piece, throw it straight onto a hot grill, and end up with something that has the exact texture and bounce of a literal rubber tire. It’s discouraging, it’s a waste of money, and it makes you want to stick to basic grilled chicken forever.
But I am here to tell you that you can master restaurant-quality mediterranean grilled octopus right in your own backyard or kitchen. You don’t need a culinary degree, and you don’t need a magical spell. What you do need is a basic understanding of kitchen science and a foolproof process.
Once you learn the secret dual-cooking method, you will realize that this is actually one of the most forgiving and easy seafood recipes you will ever make. Let’s demystify this gorgeous seafood staple and break down exactly how to achieve seafood perfection!
The Golden Rule: Escaping the “Rubber” Trap
To understand how to cook octopus successfully, we have to look under the hood at the biology of the creature. Octopus meat is almost entirely pure, dense muscle fiber packed with a massive amount of collagen. Collagen is a tough connective tissue.
If you take a raw octopus tentacle and throw it directly over a high-heat fire, those dense muscle fibers will instantly seize up, contract, and squeeze out every single drop of moisture. The result? A rubbery, chewy disaster that will give your jaw a massive workout.
To break down that stubborn collagen and turn it into rich, melt-in-your-mouth gelatin, you have to follow the golden rule of octopus: You must pre-cook the meat low and slow before it ever touches a grill.
Think of it exactly like cooking a tough cut of beef, like a brisket or a chuck roast. You wouldn’t throw a raw brisket straight onto a hot grill and expect it to be tender; you braise it or smoke it for hours first. Octopus requires the exact same mindset. The grill is not there to cook the meat from scratch—the grill’s only job is to provide that gorgeous, smoky char and crispy exterior to an already perfectly tenderized piece of seafood.
How to Tenderize Octopus: Myths vs. Reality
If you travel across Greece, Spain, or Italy, you will hear a million different old-wives’ tales about how to tenderize octopus.
- The Rock Smashing Method: Traditional fishermen on Greek islands will stand on the shore and slam a freshly caught octopus against a flat rock 40 times to break the muscle fibers. (Unless you want your neighbors staring at you with extreme concern, we can skip this one at home).
- The Wine Cork Myth: Many Mediterranean chefs swear that tossing a natural wine cork into the boiling pot with the octopus releases a magical enzyme that softens the meat. Science has proven this is completely false—but hey, it’s a fun excuse to open a bottle of wine while you cook!
- The Ultimate Secret (Freezing): This is the method that actually works, and it’s backed by real science. Buy your octopus frozen, or freeze it yourself before cooking. When the water inside the octopus cells freezes, it expands and forms sharp ice crystals. These ice crystals naturally puncture and break down those tough, rubbery muscle fibers from the inside out. Frozen octopus is actually much easier to get tender than fresh octopus!
Ingredients Checklist: Keep It Simple and Fresh
The Mediterranean philosophy of cooking seafood is all about letting the main ingredient shine. You do not want heavy sauces or overly complex spice blends masking the natural, sweet ocean flavor of the octopus. Keep your best grilled octopus marinade simple, clean, and ultra-fresh.
For the Pre-Cook Braise (The Tenderizing Phase):
- 2 to 3 lbs Whole Octopus: Frozen and thawed. (You can use large individual tentacles if your fishmonger sells them split).
- 1 Wine Cork: Entirely optional, but great for culinary good luck!
- 2 Bay Leaves: Adds a subtle, herbal aroma to the steaming liquid.
- 1 tsp Whole Black Peppercorns: For a gentle depth of flavor.
- 1/4 cup White Wine or Apple Cider Vinegar: Helps break down the exterior skin slightly.
For the Ultimate Mediterranean Marinade & Dressing:
- 1/2 cup Extra Virgin Olive Oil: Use the good stuff here! High-quality, cold-pressed olive oil makes a massive difference in seafood dishes.
- 1 Large Lemon: Freshly juiced (never use the bottled stuff).
- 4 Cloves Garlic: Finely minced or grated.
- 1 tbsp Dried Oregano: Greek oregano is preferred for that authentic Mediterranean aroma.
- Salt and Freshly Cracked Black Pepper: To taste.
- 2 tbsp Capers & Fresh Parsley: Chopped finely, for a gorgeous, bright garnish at the very end.
Step-by-Step Kitchen Walkthrough: The Foolproof Process
Now that you have your ingredients ready, let’s walk through the exact steps to create a flawless tender grilled octopus recipe.
Step 1: Cleaning and Prepping
If you bought your octopus frozen, let it thaw completely overnight in your refrigerator. Most commercially frozen octopus comes pre-cleaned (meaning the ink sac, eyes, and internal organs are already removed).
Give it a thorough rinse under cold running water. Check the center area where all the tentacles meet—this is where the hard beak lives. Use your fingers to press the beak upward from the bottom and it should pop right out. If it’s stubborn, take a small paring knife and cut a small circle around the beak to remove it.
Step 2: The Low-and-Slow Braise (No Water Needed!)
Here is another fascinating piece of kitchen science: you do not need to add water to the pot when boiling octopus. Octopus is made up of roughly 80% water. As it heats up, it will release an incredible amount of its own natural juices, essentially braising itself in its own concentrated flavor.
- Grab a large, heavy-bottomed pot or Dutch oven.
- Place the cleaned octopus inside. Toss in your bay leaves, peppercorns, vinegar, and that lucky wine cork.
- Put the lid on tightly and turn the heat to medium-low.
- Within 10 to 15 minutes, you will notice the pot is filled with a gorgeous, purple-pink liquid.
- Keep the heat low, keep the lid on, and let it simmer gently for about 45 to 60 minutes.
The Doneness Test: Take a sharp paring knife or a wooden skewer and poke it into the thickest part of the tentacle (right near the base where it met the head). If the knife slides in effortlessly with zero resistance, your octopus is perfectly tenderized. If it still feels a bit bouncy or tough, put the lid back on and check it every 10 minutes.
Step 3: The Cooling and Drying Phase (Crucial for Char!)
Once the octopus is tender, turn off the heat and let it cool down right inside its own cooking liquid for about 20 minutes. This prevents the skin from aggressively peeling off.
Carefully lift the octopus out of the pot and place it on a cutting board. Use a chef’s knife to separate the tentacles from the head. (You can slice up the head and eat it too, but the tentacles are the absolute star of the show on the grill).
Now, here is a massive pro-tip for getting that restaurant-style crispy texture: pat the tentacles completely dry with paper towels, then let them air-dry on a wire rack for at least 30 minutes. If the tentacles are wet or slimy when they hit the grill, they will steam instead of charring, and you will lose all that incredible texture.
Step 4: The Marinade Bath
In a large bowl, whisk together your extra virgin olive oil, fresh lemon juice, minced garlic, dried oregano, salt, and pepper. This is your best grilled octopus marinade.
Toss your dry, cooled tentacles directly into the bowl and coat them thoroughly in the mixture. Let them marinate at room temperature for about 15 to 20 minutes while you heat up your grill.
Step 5: High-Heat Grilling
You want your grill—whether it’s a charcoal grill, a gas grill, or a heavy cast-iron grill pan on your stovetop—to be screaming hot. Clean the grates thoroughly and brush them lightly with oil to prevent any sticking.
- Using tongs, lift the marinating tentacles out of the bowl (save the leftover marinade in the bowl—do not throw it away!).
- Lay the tentacles across the hot grates. You should hear an immediate, loud, satisfying sizzle.
- Grill for about 3 to 4 minutes per side. Remember, the meat is already fully cooked and tender; we are only here to develop flavor, crisp up the exterior suction cups, and get those gorgeous dark grill marks.
- Once the tentacles are beautifully charred and sizzling, pull them off the grill and place them onto a serving platter.
Step 6: The Finishing Touch (Ladolemono)
Take that leftover marinade from the bowl, give it a quick whisk to re-emulsify the oil and lemon juice, and pour it generously over the hot, freshly grilled tentacles.
Top the dish with a shower of fresh chopped parsley, some salty capers, and a few extra lemon wedges on the side. Serve it warm, and watch everyone’s jaws drop as they take their first incredibly tender bite!
Alternative Cooking Methods: Stovetop & Air Fryer
Don’t have an outdoor grill? No problem at all! You don’t need a backyard setup to enjoy this incredible tender grilled octopus recipe.
The Cast-Iron Grill Pan Method
If you’re cooking indoors, a heavy-duty cast-iron grill pan is your absolute best friend. Get it smoking hot over high heat on your stovetop. Lay the marinated tentacles down and press them gently with a spatula to ensure maximum contact with the ridges. Cook for 3 to 4 minutes per side until you see deep, beautiful char marks. Make sure your kitchen exhaust fan is turned on high!
The Air Fryer Crisping Method
Yes, you can absolutely air fry your octopus for an incredibly fast and crispy result!
- After your low-and-slow simmer phase, dry the tentacles completely and toss them in the olive oil and garlic marinade.
- Preheat your air fryer to 400°F (200°C).
- Place the tentacles in a single layer in the air fryer basket.
- Air fry for 8 to 10 minutes, giving the basket a good shake halfway through, until the edges are crispy and deeply golden-brown.
Perfect Mediterranean Pairings: What to Serve
To turn your grilled octopus into a complete, show-stopping feast, pair it with simple, rustic side dishes that evoke the feeling of a sun-drenched Greek island tavern.
- Greek Lemon Potatoes: Thick wedges of potatoes roasted in a bath of olive oil, chicken broth, lemon juice, and plenty of garlic. The starchy, crispy potatoes absorb the flavors beautifully.
- Classic Greek Salad: A vibrant, refreshing mix of crisp cucumbers, ripe tomatoes, red onion, kalamata olives, and a giant block of creamy feta cheese drizzled with wild oregano.
- Crusty Sourdough Bread: Essential for wiping your plate clean and soaking up every last drop of that incredible lemon-garlic olive oil dressing.
- The Perfect Wine: Pair this dish with a crisp, dry, ice-cold white wine. An Assyrtiko from Santorini, a Sauvignon Blanc, or a dry Pinot Grigio cuts through the richness of the olive oil and complements the smoky seafood perfectly.
Storage and Reheating Tips
On the off chance that you have leftovers, cooked octopus stores surprisingly well and can be transformed into incredible salads the next day.
Storage
Let the grilled tentacles cool completely. Cut them into bite-sized coins, place them into an airtight container, and pour any remaining lemon-oil dressing over them to keep them hydrated. Store in the refrigerator for up to 2 to 3 days.
Reheating Without Turning It to Rubber
Reheating seafood can be tricky, but because we broke down the collagen during the long simmer phase, it is relatively stable.
- Avoid the Microwave: The microwave will instantly turn your tender seafood into a chewy mess.
- The Quick Sauté: Heat a splash of olive oil in a non-stick skillet over medium-high heat. Toss in your leftover octopus pieces and sauté quickly for 2 to 3 minutes just until warmed through.
- Enjoy It Cold: Leftover grilled octopus tastes absolutely incredible served cold! Toss it directly with some fresh arugula, chickpeas, cherry tomatoes, and an extra squeeze of lemon juice for an effortless, gourmet Mediterranean salad.
Frequently Asked Questions (FAQs)
Should I peel the skin off the octopus before grilling?
Absolutely not! The skin and the little suction cups are where all the incredible texture lives. When you grill it at a high temperature, the skin crisps up and develops a wonderful smoky flavor. While some skin may naturally slip off during the boiling process, don’t intentionally scrape it off.
Can I skip the boiling phase if I marinate it long enough?
No. No amount of marinating, acid, or pounding will make a raw octopus tender enough to eat straight from the grill. Skipping the low-and-slow pre-cook phase is the number one reason people end up with rubbery octopus. Trust the process!
How do I know if I bought a good quality octopus?
When shopping, look for octopus that has a clean, pleasant ocean smell—it should never smell fishy or sour. The flesh should be firm to the touch. If buying frozen, ensure there is no significant freezer burn inside the packaging.
Final Thoughts: You Are Now a Seafood Master!
Cooking seafood at home doesn’t have to be a stressful guessing game. By mastering the dual-cooking technique—breaking down the tough fibers with a slow, gentle braise and finishing with a hot, fast char—you have unlocked the secret to the perfect Grilled Octopus.
It’s an incredibly rewarding dish to cook. It looks impressive, it tastes absolutely phenomenal, and it will give you a massive boost of confidence in your kitchen skills.
So, step out of your comfort zone, head to your local seafood market, and bring a taste of the beautiful Mediterranean coast right into your own home tonight. Your family and friends will be talking about this dinner for weeks!
Happy grilling, everyone! 🐙🍋✨