
The Absolute Best Honey Garlic Pork Tenderloin You’ll Ever Eat
Let’s face a hard truth together: pork gets a bad reputation in the home-cooking world. Too many of us grew up eating pork that had the texture of a leather shoe—dry, chewy, and completely dependent on a lake of bottled applesauce just to make it swallowable. If you’ve been scarred by dry pork in the past, I am here to personally apologize on behalf of home cooks everywhere, and more importantly, to completely rewrite your culinary future.
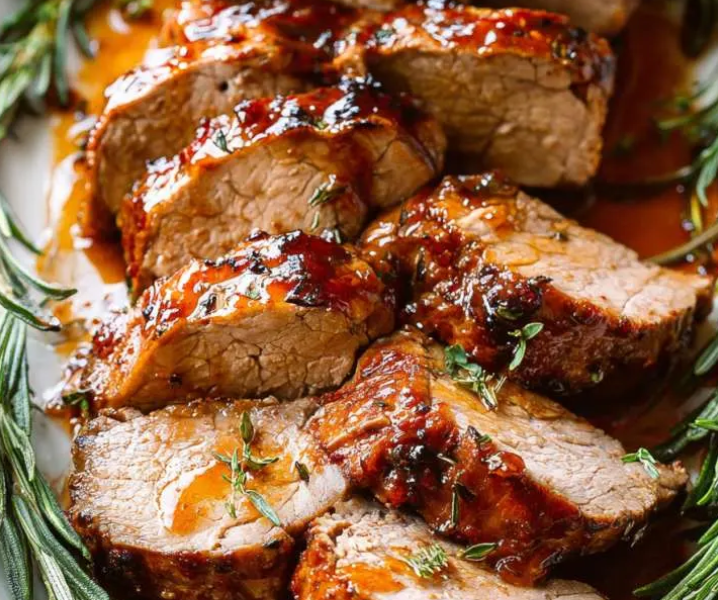
Welcome to your new dinner obsession: Honey Garlic Pork Tenderloin.
This recipe is an absolute game-changer. It is sticky, sweet, savory, incredibly juicy, and features a glossy glaze that you will want to drizzle over absolutely everything in sight. Best of all? It’s a quick weeknight dinner idea that looks and tastes like it came straight out of a high-end restaurant kitchen, but it actually comes together in less than 30 minutes.
If you are looking for the best sweet and savory pork recipe on the internet, congratulations—you just found it. Grab your favorite skillet, tie on your apron, and let’s dive deep into the world of perfectly glazed pork.
Pork Tenderloin vs. Pork Loin: Don’t Make This Common Mistake!
Before we even look at a bottle of honey or a clove of garlic, we need to clear up one of the biggest points of confusion in the entire meat department: the difference between a pork tenderloin and a pork loin.
They sound almost identical, right? But swapping one for the other in this recipe is the fastest way to ruin dinner. Let’s break down the differences so you can shop like an absolute pro.
The Pork Tenderloin (Our Star)
The pork tenderloin is a long, thin, narrow strip of meat that comes from along the spine of the pig. Because this muscle doesn’t do a lot of heavy lifting, it is incredibly lean, delicate, and—true to its name—unbelievably tender. It cooks incredibly fast, making it the ultimate protein choice for an easy pork tenderloin recipe when you are short on time.
The Pork Loin (The Imposter)
On the flip side, a pork loin is a massive, wide, thick cut of meat that usually features a thick fat cap on top. It is often cut into bone-in or boneless pork chops or roasted slowly over several hours. If you try to cook a thick pork loin using a quick tenderloin method, the outside will burn to a crisp before the inside even thinks about warming up.
Natasya’s Golden Rule: Always look for the package that says tenderloin. They usually come in packages of one or two, weighing around 1 to 1.5 pounds each. If it looks like a long, cylindrical log of meat, you’ve got the right one!
The Magic Science of the Honey Garlic Sauce
What takes this dish from a standard piece of baked meat to a legendary culinary masterpiece? The honey garlic sauce for pork.
This sauce is a beautiful display of culinary balance. When you are cooking with a super lean meat like pork tenderloin, you don’t have a lot of intramuscular fat to provide flavor and moisture. That means your cooking technique and your sauce have to do the heavy lifting.
This sauce relies on a four-part harmony:
- The Sweetness (Honey): The sugars in the honey don’t just add a beautiful sweetness; they also create the base for the sticky, glossy glaze. As the honey heats up in the pan, it undergoes caramelization, turning into a deeply complex flavor engine.
- The Aromatics (Garlic): We aren’t being shy with the garlic here. We need enough fresh minced garlic to cut through the heavy sweetness of the honey, providing a sharp, pungent contrast that balances the entire profile.
- The Umami (Soy Sauce): Soy sauce introduces deep, salty, savory notes that anchor the sweetness of the honey. It gives the sauce its beautiful, dark amber color and ensures the pork tastes incredibly rich.
- The Acidity (Apple Cider Vinegar): Never skip the acid! A splash of vinegar cuts through the sweetness and the salt, brightening the entire dish and waking up your taste buds.
Ingredients Checklist: What You Need
The beauty of a truly great homemade chicken dish or pork dinner is simplicity. You do not need to hunt down weird, obscure ingredients at a specialty grocery market. You probably have almost all of these sitting in your pantry right now!
For the Pork:
- 1.5 lbs Pork Tenderloin: Trimmed of any excess fat and silverskin (we’ll talk about how to do that in a minute).
- 1 tbsp Olive Oil: Or any neutral oil with a high smoke point (like avocado or canola oil) for searing.
- 1 tsp Garlic Powder: For our dry rub base.
- 1 tsp Onion Powder: Adds a subtle depth to the meat itself.
- Salt and Black Pepper: Be generous here; meat loves salt!
For the Epic Honey Garlic Glaze:
- 1/3 cup Honey: Raw, local honey is fantastic, but any liquid honey from your pantry works perfectly.
- 6 cloves Garlic: Minced as finely as possible. Yes, six cloves! Trust the process.
- 2 tbsp Soy Sauce: Low-sodium soy sauce is preferred so you can fully control the salt level.
- 1 tbsp Apple Cider Vinegar: Adds that essential punch of brightness.
- 1/2 tsp Red Pepper Flakes (Optional): If you like a tiny bit of background heat to contrast the sweet glaze.
Step-by-Step Kitchen Walkthrough: Mastering the Technique
Now that your ingredients are gathered, it’s time to head to the stove. This recipe uses a two-stage cooking method: an initial sear on the stovetop to lock in the juices and build flavor, followed by a quick finish in a hot oven to cook the center perfectly.
Step 1: Prep the Meat and Lose the “Silverskin”
Before you season the pork, take a look at the surface of the meat. You will likely see a shiny, silvery, whitish membrane running along part of the tenderloin. This is called the silverskin. Unlike regular fat, silverskin does not melt or soften when cooked; instead, it turns into a tough, rubbery strip that ruins the texture of your meat.
To remove it, slip a sharp, flexible knife right underneath the membrane at one end. Angle your knife blade slightly upward against the skin and slide it down the length of the tenderloin, peeling the silver strip away.
Once your meat is trimmed, pat it completely dry with paper towels. Moisture is the enemy of a good sear! If the meat is wet, it will steam instead of browning.
Step 2: The Seasoning Rub
In a small bowl, mix together your garlic powder, onion powder, salt, and freshly cracked black pepper. Rub this mixture evenly over all sides of your dry pork tenderloin, pressing it gently into the meat so it sticks.
Step 3: The Ultimate Sear
Preheat your oven to 400°F (200°C).
Place a large, oven-safe skillet (cast iron is the absolute king for this) over medium-high heat and add your olive oil. Once the oil is shimmering and hot, carefully place the seasoned pork tenderloin into the pan.
Leave it alone for about 2 to 3 minutes until a gorgeous, golden-brown crust forms on the bottom. Rotate the meat and repeat until all sides are beautifully seared. This step is crucial because it triggers the Maillard reaction—the chemical process that gives seared meat its deeply savory, irresistible flavor profile.
Step 4: Build the Glaze in the Pan
Once the pork is seared on all sides, turn the heat down to medium. Push the pork slightly to one side of the skillet (or just work around it). Toss your fresh minced garlic directly into the hot oil and stir continuously for about 30 seconds. You will instantly smell an incredible aroma—just make sure not to let the garlic burn!
Quickly pour in the honey, soy sauce, apple cider vinegar, and red pepper flakes. Stir everything together, letting the mixture come to a bubbly simmer. Use a large spoon to continuously scoop up that gorgeous, warm sauce and pour it directly over the top of the pork tenderloin, basting it generously.
Step 5: The Oven Finish
Transfer the entire oven-safe skillet directly into your preheated oven. Bake for about 12 to 15 minutes.
Every 5 minutes, carefully open the oven door and use your spoon to baste the pork with more of the pan juices. As the sauce reduces in the dry heat of the oven, it will transform into a thick, sticky, mahogany-colored glaze that clings beautifully to the meat.
Step 6: The Rest (Do Not Skip!)
Pull the skillet out of the oven. Transfer the pork tenderloin to a clean cutting board.
Now comes the hardest part of the entire process: leave it alone for 5 to 10 minutes. Do not cut into it yet! If you slice the meat immediately, all the internal juices will rush out onto your cutting board, leaving your juicy baked pork tenderloin completely dry. Resting allows the muscle fibers to relax and reabsorb those delicious juices, keeping every single bite melt-in-your-mouth tender.
How to Cook Pork Tenderloin Without Drying It Out
If there is one thing I want you to take away from this guide, it is this: invest in a digital meat thermometer.
For decades, government food safety guidelines recommended cooking pork to a whopping 160°F (71°C). At that temperature, lean pork tenderloin loses every single drop of its moisture and turns into literal chalk. Thankfully, times have changed! The USDA officially updated its guidelines, confirming that pork is perfectly safe and delicious when cooked to a medium doneness.
PORK DONENESS TEMPERATURE GUIDE:
145°F (63°C)  --> Medium-Rare (Pink, ultra-juicy)
150°F (66°C)  --> Medium (Slightly pink, very tender)
160°F (71°C)  --> Well-Done (Dry, chewy - avoid!)
For the absolute best sweet and savory pork, you want to push your digital thermometer probe into the thickest part of the tenderloin while it is still in the oven. Pull the meat out when it hits 140°F to 142°F. Why? Because of a neat little trick called “carryover cooking.”
While the meat rests on your cutting board, the residual heat locked inside will continue to raise the internal temperature by another 3 to 5 degrees, landing you right at that perfect, juicy 145°F mark. Your pork will have a gorgeous, very subtle blush of pink in the center, and it will be softer than you ever thought possible.
Alternative Cooking Methods: Slow Cooker & Air Fryer
While the stovetop-to-oven skillet method is my personal favorite because it gives you that restaurant-quality sear, you can easily adapt this recipe to fit your favorite kitchen gadgets!
The Slow Cooker Method (Set It and Forget It)
If you want to come home after a long day at the office to a house that smells like heaven, the crockpot is your best friend.
- Place your seasoned pork tenderloin directly into the bottom of your slow cooker.
- Whisk the honey, minced garlic, soy sauce, and apple cider vinegar together in a small bowl, then pour it completely over the pork.
- Cover and cook on LOW for 4 to 5 hours (avoid cooking on HIGH, as lean pork tenderloin can dry out quickly under high slow-cooker heat).
- Remove the pork. Pour the remaining liquid from the pot into a small saucepan and simmer it over medium-high heat on your stove for 5 minutes with a quick cornstarch slurry (1 tsp cornstarch mixed with 1 tsp cold water) to thicken it into a glossy glaze to pour over your sliced meat.
The Air Fryer Method (Super Fast & Crispy)
If you are in a massive rush and want dinner ready in record time, your air fryer can work wonders.
- Preheat your air fryer to 375°F (190°C).
- Season your pork tenderloin and spray it lightly with olive oil spray.
- Place it into the air fryer basket (if your tenderloin is too long, you can cut it in half to make it fit!).
- Cook for 18 to 22 minutes, flipping the meat halfway through the cooking time.
- While it cooks, simmer your honey garlic sauce components in a small saucepan on the stove until thick. Baste the pork with the glaze during the last 3 minutes of air frying, then serve the rest on the side.
Perfect Sides: What to Serve with Your Glazed Pork
Because this Honey Garlic Pork Tenderloin features an intensely flavorful, sweet, and savory sauce, you want to pair it with side dishes that can help soak up all that extra liquid gold from your plate. Here are my favorite pairings:
1. The Carb Soakers
- Fluffy White Rice: Jasmine or Basmati rice is an incredible canvas for this dish. Pour a generous spoonful of the extra warm honey garlic pan glaze right over the rice.
- Garlic Mashed Potatoes: The creamy texture of home-made mashed potatoes pairs beautifully with the sweet profile of the pork glaze.
- Quinoa or Brown Rice: For a nuttier, fiber-packed option that feels a bit lighter.
2. The Vibrant Veggies
- Roasted Broccoli Florets: Toss your broccoli with olive oil, salt, and pepper, and roast it at the same temperature as the pork. The crispy charred edges of the broccoli soak up the sweet glaze beautifully.
- Garlic Butter Green Beans: Sautéed quickly in a skillet to preserve that fresh, crisp snap.
- Roasted Brussels Sprouts: Cut them in half and let them caramelize in the oven alongside your meat.
Leftovers, Storage, and Reheating (Keep it Moist on Day 2!)
If you happen to have any leftovers of this incredible easy pork tenderloin recipe, consider yourself incredibly lucky. It makes for some of the best next-day lunches you could ever ask for.
Storing in the Fridge
Let the cooked pork cool completely to room temperature. Slice it up or leave it whole, then place it into an airtight glass container. Make sure you pour every single drop of the remaining honey garlic glaze from the pan over the top of the meat before sealing it. It will keep beautifully in the refrigerator for up to 3 to 4 days.
Freezing for Later
You can absolutely freeze this dish! Wrap the cooked, cooled tenderloin tightly in plastic wrap, then place it into a heavy-duty freezer bag along with the excess sauce. It will freeze perfectly for up to 3 months. Let it thaw completely overnight in the refrigerator before reheating.
The Secret to Reheating Without Drying It Out
Please, I beg of you, do not just throw your cold pork tenderloin into the microwave for two minutes on high power. The microwave will instantly dry out those delicate proteins, turning your beautiful, juicy pork into rubber.
Instead, use one of these gentle methods:
- The Skillet Method (Best): Place your sliced pork and the leftover glaze into a non-stick skillet over medium-low heat. Add a splash of water or chicken broth to thin out the sauce. Cover with a lid and let it steam gently for 4 to 5 minutes until just warmed through.
- The Oven Method: Wrap the pork slices loosely in aluminum foil with a few spoonfuls of the glaze. Warm it up in a 325°F (160°C) oven for about 8 to 10 minutes.
Frequently Asked Questions (FAQ)
Can I use garlic paste instead of fresh minced garlic?
While garlic paste will work in a pinch, I highly recommend using fresh garlic cloves for this recipe. Freshly minced garlic has a bright, pungent flavor and texture that creates a gorgeous rustic look in the caramelized glaze, which paste simply cannot match.
Is honey garlic pork tenderloin gluten-free?
As long as you swap out the traditional soy sauce for a certified gluten-free Tamari or coconut aminos, this entire recipe is 100% gluten-free! Always double-check your labels to be absolutely certain.
What should I do if my glaze is too runny?
If your sauce hasn’t thickened up to your liking by the time the pork is done cooking, don’t worry! Simply remove the pork to rest, put the skillet back on the stovetop over medium-high heat, and let the sauce boil rapidly for 2 to 3 minutes. The water will evaporate quickly, leaving behind a thick, syrupy glaze.
Can I use this sauce recipe for other proteins?
Absolutely! This honey garlic glaze works flawlessly as a buffalo wing sauce alternative for crispy chicken wings, poured over baked salmon, or used as a stir-fry sauce for shrimp and vegetables. It is an incredibly versatile weapon to have in your culinary toolkit.
Final Thoughts: Bring the Family to the Table
At the end of the day, cooking shouldn’t be stressful, and it definitely shouldn’t be boring. This Honey Garlic Pork Tenderloin balances simplicity with deep, restaurant-quality flavor profiles, making it a recipe you will find yourself coming back to week after week.
It breaks all the stereotypes of the dry, boring pork dinners of our past and delivers an explosion of sweet, savory, garlicky goodness that will have everyone in your household begging for seconds.
So, stop over-thinking weeknight dinners. Head out to the store, grab a beautiful pork tenderloin, and give your family a meal they won’t forget.
Happy cooking, everyone! 👩🍳✨