
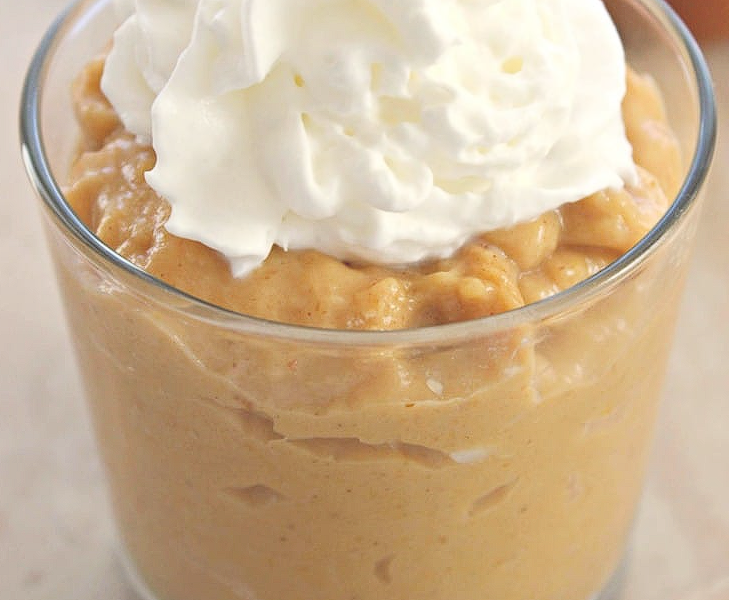
The Ultimate Creamy Homemade Pumpkin Pudding Recipe (Your New Fall Obsession)
Let’s be completely honest for a second: the moment the calendar flips to September, the entire world goes completely crazy for pumpkin spice. We see it in lattes, in candles, in cookies, and even in cereal. But amidst all the pumpkin pie and heavy baked goods, there is one unsung hero of the autumn dessert world that deserves an immediate spot on your weekly menu.
Enter: Homemade Pumpkin Pudding.
If you are looking for the absolute best fall desserts, you need to stop whatever you are doing and pay attention. This isn’t that artificial-tasting, bright orange stuff you get from a little plastic cup at the grocery store. We are talking about a luxurious, velvety, ultra-creamy, from-scratch Pumpkin Pudding Recipe that tastes exactly like the silky center of a gourmet pumpkin pie—but without the stress of rolling out a crust or turning on your oven.
Whether you are looking for a quick weeknight treat to curl up with under a blanket, or you need stress-free, make-ahead Thanksgiving dessert ideas to impress your in-laws, this creamy pumpkin dessert is going to blow your mind.
Grab a whisk, put on your coziest sweater, and let’s dive deep into the magic of making pudding from scratch!
Why You Need This Creamy Pumpkin Dessert in Your Life
There are a million pumpkin recipes out there, so why should this one make the cut? Let me break down exactly why this easy homemade pumpkin pudding is going to become a permanent staple in your seasonal rotation.
1. It is 100% No-Bake
Baking can be stressful. You have to worry about exact temperatures, rising agents, and whether the center of your pie is actually set or just pretending to be. Pudding removes all of that anxiety. It all happens right on the stovetop where you can see it, control it, and taste it as you go.
2. The Texture is Unmatched
If you love the flavor of pumpkin pie but sometimes find the texture a little too dense or firm, pudding is your answer. Because we use a combination of milk, cream, and cornstarch, the final result is light, silky, and melts instantly on your tongue.
3. It’s the Ultimate Make-Ahead Dessert
Hosting a dinner party? The last thing you want is to be stuck in the kitchen fussing over dessert while your guests are having fun. This Pumpkin Pudding Recipe actually requires time in the fridge to set up properly. You can make it a full day or two in advance, portion it into cute little jars or ramekins, and just pull them out when you are ready to serve.
The Great Debate: Pumpkin Puree vs. Pumpkin Pie Filling
Before we even look at the ingredient list, we need to address the most common mistake people make when baking or cooking with pumpkin. When you walk down the baking aisle at the grocery store, you will see two cans that look almost exactly identical.
One says 100% Pure Pumpkin (or Pumpkin Puree). The other says Pumpkin Pie Filling.
For this recipe—and honestly, for almost all from-scratch recipes—you must buy the 100% Pure Pumpkin.
Why? Because pumpkin pie filling is already loaded with sweeteners, artificial flavors, and thickeners. If you use it in a recipe that already calls for sugar and spices, your final dish will be overwhelmingly sweet and completely unbalanced. Pure pumpkin puree is just a blank, earthy canvas waiting for us to add our own magic. We want to be in total control of how much cinnamon, nutmeg, and sugar goes into our dessert!
The Master Ingredient List: What You Need
Making pudding from scratch sounds intimidating, but when you look at the ingredients, you’ll realize it’s actually incredibly straightforward. Here is what you need to create this creamy pumpkin dessert:
- 100% Pure Pumpkin Puree: One standard 15-ounce can. (Do not use pumpkin pie filling!)
- Whole Milk: You need the fat content to make the pudding creamy. Skim milk will result in a watery, icy texture.
- Heavy Whipping Cream: This is the secret to that luxurious, restaurant-quality mouthfeel.
- Cornstarch: This is our thickening agent. It activates when heated and gives the pudding its structure.
- Brown Sugar: The molasses in brown sugar pairs perfectly with the earthiness of the pumpkin. Light or dark brown sugar both work beautifully!
- Granulated White Sugar: For a clean, straightforward sweetness to balance the brown sugar.
- Egg Yolks: Notice we are only using the yolks! The yolks add richness and a beautiful custardy texture.
- Vanilla Extract: Always use pure vanilla extract, never the imitation stuff. It makes a huge difference.
- The Spices: Cinnamon, nutmeg, ginger, and a tiny pinch of cloves. (You can also substitute all of this with 2 teaspoons of pre-mixed Pumpkin Pie Spice).
- A Pinch of Salt: Never skip the salt in a dessert. It enhances all the other flavors and keeps the pudding from tasting flat.
Step-by-Step Instructions: How to Make Pumpkin Pudding From Scratch
Making homemade pudding is all about patience and a little bit of arm strength for whisking. Follow these steps exactly, and you will have flawless pudding every single time.
Step 1: Whisk the Dry Ingredients
In a medium-sized saucepan (off the heat), whisk together your brown sugar, white sugar, cornstarch, salt, and all of your beautiful fall spices. Whisking them dry first ensures that the cornstarch breaks up and doesn’t form annoying little lumps when we add the liquid.
Step 2: Incorporate the Wet Base
Add the milk and heavy cream to your saucepan. Whisk vigorously until the sugar is completely dissolved and the mixture is smooth.
Step 3: Tempering the Eggs (The Most Important Step!)
In a separate small bowl, whisk your egg yolks until they are smooth. Now, we can’t just dump raw egg yolks into a hot pan, or you will end up with pumpkin-flavored scrambled eggs.
First, place your saucepan with the milk and sugar mixture over medium heat. Let it warm up until it is steaming, but not boiling. Take a ladle or a measuring cup, scoop out about half a cup of the hot milk mixture, and very slowly drizzle it into the bowl with your egg yolks while whisking the yolks constantly.
This process is called tempering. It gently raises the temperature of the eggs so they don’t shock and scramble. Once the eggs are warmed up, slowly pour the egg mixture back into the saucepan on the stove, whisking constantly.
Step 4: Add the Pumpkin and Thicken
Now, whisk in your pure pumpkin puree. Keep the heat on medium (do not be tempted to turn it up to high to rush the process!). Whisk the mixture continuously. You cannot walk away from the stove during this part!
After about 5 to 8 minutes, you will feel the whisk start to meet resistance. The mixture will begin to bubble lazily and pull away slightly from the sides of the pan. Let it bubble for exactly ONE minute while whisking vigorously, then immediately pull the pan off the heat.
Step 5: The Final Flavor Enhancers
Off the heat, stir in your pure vanilla extract and, if you want to be extra decadent, a tablespoon of cold unsalted butter. The butter adds a final glossy sheen to the pudding.
Step 6: The Chill
Pour the hot pudding immediately into individual serving glasses, ramekins, or one large serving bowl.
Pro-Tip to prevent the “skin”: When pudding cools in the fridge, exposure to air causes a tough, rubbery skin to form on the top. To prevent this, take a piece of plastic wrap and press it directly onto the surface of the hot pudding so there is no air trapped between the plastic and the dessert.
Chill in the refrigerator for at least 4 hours, or ideally overnight, until it is completely cold and set.
Pro-Tips for the Ultimate Spiced Pumpkin Pie Pudding
Even though this is an easy homemade pumpkin pudding, a few professional tricks can elevate it from good to absolutely spectacular.
- Strain for Perfection: If you want a perfectly silky texture (like the kind you get at a fancy restaurant), pour your hot pudding through a fine-mesh sieve or strainer before you put it in the fridge. This catches any tiny bits of egg yolk that might have cooked too quickly or any un-dissolved spices.
- Adjust the Spice Level: Everyone’s tolerance for spice is different. If you love a bold, punchy dessert, increase the ginger and clove slightly. If you prefer a milder flavor, stick heavily to just the cinnamon and vanilla.
- Don’t Rush the Cornstarch: Cornstarch needs to reach a boiling point to fully activate its thickening properties, but it also needs to cook for a minute to get rid of its raw, starchy flavor. Make sure you see those bubbles before pulling it off the heat!
Next-Level Flavor Variations
The best part about learning how to make pumpkin pudding from scratch is that you can customize the base recipe to fit your exact cravings. Here are a few ways to switch things up:
- Bourbon Maple Pumpkin Pudding: Swap out the white sugar for pure maple syrup, and add 2 tablespoons of good quality bourbon right at the end when you add the vanilla. The alcohol cooks off slightly, leaving a deep, oaky flavor that screams autumn.
- Chocolate Swirl: Pumpkin and chocolate are a highly underrated combination. Once your pudding is off the heat, gently fold in a half-cup of mini semi-sweet chocolate chips. They will melt slightly into the warm pudding, creating gorgeous, rich chocolate ribbons.
- Dairy-Free/Vegan Option: You can easily make this vegan! Swap the milk and heavy cream for full-fat canned coconut milk (the thick kind). Skip the egg yolks, and increase the cornstarch by 1 extra tablespoon to make up for the lost thickening power of the eggs.
Epic Serving Suggestions and Toppings
A bowl of plain pudding is delicious, but we eat with our eyes first! The toppings provide crucial textural contrast to the silky pudding. You need something crunchy to balance out the creaminess.
Here is how you build the ultimate dessert bowl:
- The Classic: A massive dollop of freshly whipped cream (sweetened with a little powdered sugar and vanilla) and a light dusting of cinnamon or freshly grated nutmeg.
- The Pie Illusion: Crush up graham crackers or Biscoff cookies and layer them at the bottom of your serving glass before pouring in the hot pudding. It creates a faux-pie crust that softens perfectly in the fridge.
- The Crunch Factor: Top your chilled pudding with candied pecans, toasted walnuts, or roasted pumpkin seeds (pepitas). The salty-sweet crunch against the cold pudding is heavenly.
- The Gingersnap Dip: Forget spoons altogether. Serve the pudding in a large bowl surrounded by crispy gingersnap cookies and let your guests use the cookies to scoop up the pudding!
Make-Ahead, Storage, and Freezing Rules
Because this dessert requires chilling time, it is naturally built for meal prep and holiday planning.
How long does homemade pudding last in the fridge? When stored in an airtight container (or tightly wrapped with plastic wrap touching the surface), this Pumpkin Pudding Recipe will stay fresh and delicious in the refrigerator for up to 4 to 5 days.
Can I freeze homemade pudding? No. Please do not put this in the freezer! Because this recipe is thickened with cornstarch and contains dairy, the freezing and thawing process will destroy the molecular structure. When it thaws, the pudding will “weep,” separating into a watery, curdled, unappetizing mess. Keep it strictly in the fridge!
Frequently Asked Questions (FAQs)
My pudding didn’t thicken in the fridge! What went wrong? If your pudding is still runny after 4 hours in the fridge, it means the cornstarch wasn’t activated properly on the stove. You likely didn’t let the mixture come to a full bubble before taking it off the heat. Unfortunately, once it’s chilled, you can’t really re-thicken it. But don’t throw it away! Pour it over ice cream, use it as a pancake syrup, or blend it with ice and milk for an epic pumpkin milkshake.
Can I use fresh roasted pumpkin instead of canned? You absolutely can, but with a warning. Freshly roasted and pureed pumpkin holds a lot more water than the canned version. If you want to use fresh pumpkin puree, you need to let it sit in a fine-mesh strainer lined with cheesecloth or a coffee filter over a bowl for a few hours to drain out the excess liquid. If you skip this step, your pudding will be too watery.
Is this recipe gluten-free? Yes! As long as you ensure your cornstarch is certified gluten-free and you don’t add any graham crackers or cookies as toppings, this entire dessert is naturally gluten-free and safe for guests with gluten sensitivities.
Final Thoughts: Embrace the Pudding!
If you have never made homemade pudding before, let this be the recipe that finally convinces you to try. The difference between a powdered box mix and a rich, stove-top Pumpkin Pudding Recipe is absolutely staggering.
It is cozy, it is comforting, and it packs all the nostalgic flavors of the autumn season into one perfect little bowl. Whether you are prepping for a massive holiday feast or just treating yourself on a rainy Tuesday night, this creamy pumpkin dessert is guaranteed to hit the spot.
So grab those cans of pure pumpkin before the grocery stores sell out, fire up your stove, and get ready to enjoy the ultimate taste of fall. Happy whisking!